— RESOLVED —
Thank you to @Hooverdan and @criddle for contributing your ideas. It’s working now.
The key was to completely remove the cmd_arguments section from the rock-on config. Instead, i added both --gpus=all and -e NVIDIA_VISIBLE_DEVICES=all to the opts section of the config and everything worked. See below for the long of it all.
For anyone visiting this topic in the future, here is a bunch of info on how I got Nvidia hardware accelerated transcoding working on my server.
It should mostly be in order of operation, but first, some useful websites to reference:
https://www.nvidia.com/en-us/drivers/details/254665/
https://en.opensuse.org/SDB:NVIDIA_drivers
https://developer.nvidia.com/video-encode-decode-support-matrix
1. Add Nvidia Repo
zypper addrepo --refresh https://download.nvidia.com/opensuse/leap/15.6/ nvidia
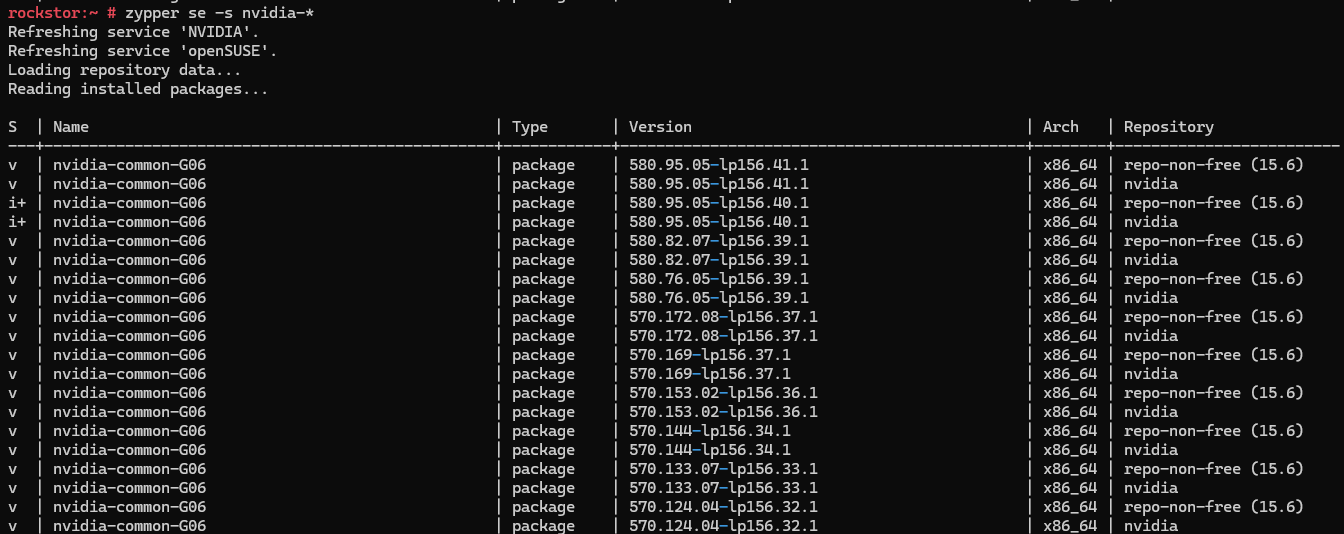
2. Search Nvidia Drivers
Use the nvidia driver details webpage I posted to find which version of the drivers to install. For the GTX 980 Ti we want Linux x64 (AMD64/EM64T) Display Driver 580.95.05.
If you don’t know which packages to install, do a zypper search to find your driver version.
zypper se -s x11-video-nvidia*G0* nvidia-video-G0* nvidia-gl*G0* nvidia-compute*G0* nvidia-compute-utils-G0*
3. Install Drivers and nvidia-docker2
*I have no idea which drivers are required so I installed the kitchen sink…
$ zypper --gpg-auto-import-keys install nvidia-driver-G06-kmp-default nvidia-driver-G06-kmp-meta nvidia-userspace-meta-G06 nvidia-common-G06 nvidia-video-G06 nvidia-gl-G06 nvidia-compute-utils-G06 nvidia-compute-G06 nvidia-persistenced nvidia-modprobe nvidia-container-toolkit nvidia-container-toolkit-base nvidia-container-runtime libnvidia-container-tools libnvidia-container1 nvidia-docker2
Make sure your kernel version matches the client version
cat /proc/driver/nvidia/version
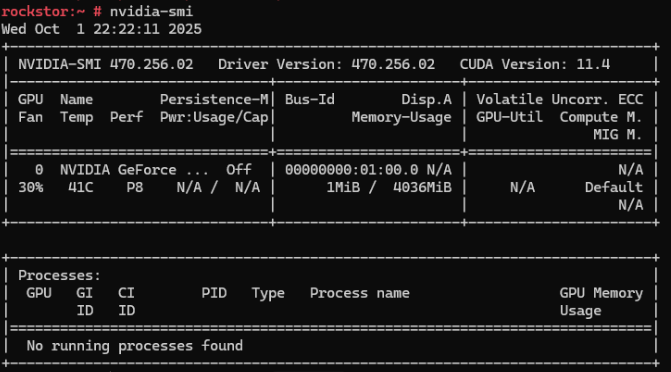
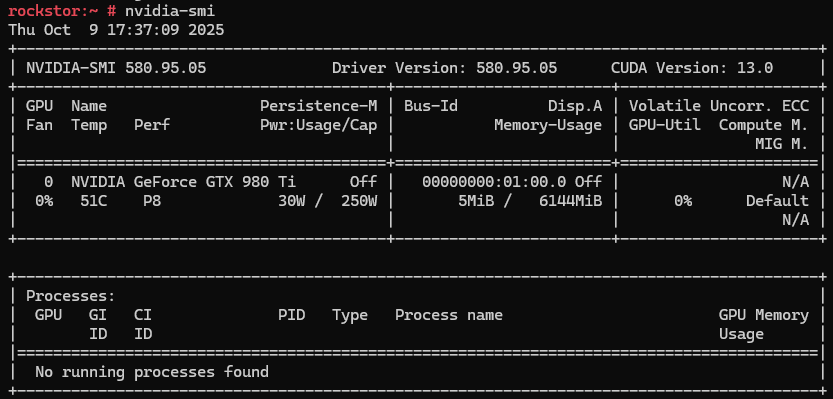
nvidia-smi
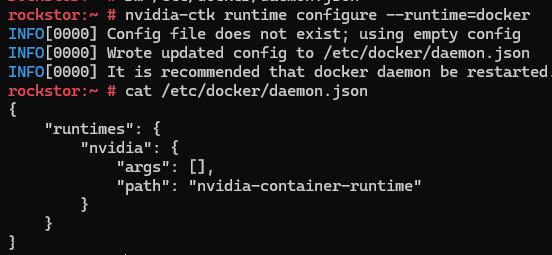
4. Configure nvidia-container-runtime
nvidia-ctk runtime configure --runtime=docker
nvidia-ctk runtime configure --runtime=containerd
*I edited mine with the following:
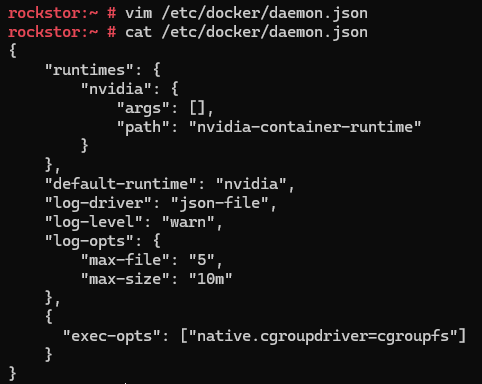
Restart Docker
$ systemctl restart docker
$ systemctl restart containerd
5. Check Nvidia Container Version
nvidia-container-cli -V
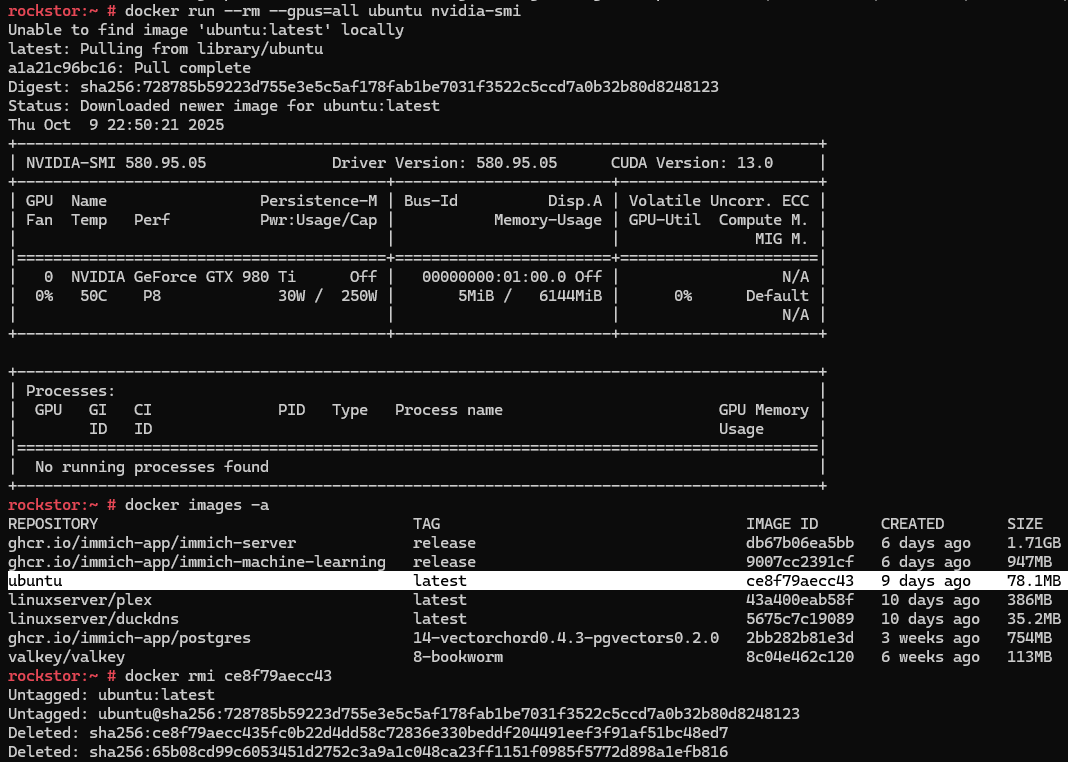
6. Now, run a sample workload
You should get the nvidia-smi output with no errors.
docker run --rm --gpus=all ubuntu nvidia-smi
Reboot (optional)
Out of habit, I always reboot after installing graphics drivers.
reboot now -h
7. Next, lets create a custom Rock-on repository for our Nvidia-Enabled Plex Image
Note: If you don’t want to mess around with managing ports, it works best if you stop and uninstall your existing Plex rock-on via the webUI if applicable.
 plex-nvidia.json
vim /opt/rockstor/rockons-metastore/plex-nvidia.json
{
"Plex-Nvidia": {
"containers": {
"plex-linuxserver.io.nvidia": {
"image": "linuxserver/plex",
"opts": [
[
"--net=host",
""
],
[
"--gpus=all",
""
],
[
"-e",
"NVIDIA_VISIBLE_DEVICES=all"
]
],
"launch_order": 1,
"devices": {
"/dev/dri": {
"description": "optional device path for enabling Intel QuickSync (example: /dev/dri). Leave blank if not needed. Check CPU documentation at ark.intel.com to check for QuickSync support.",
"label": "QuickSync device"
}
},
"ports": {
"32400": {
"description": "WebUI port. Suggested default: 32400",
"host_default": 32400,
"label": "WebUI port",
"ui": true
}
},
"volumes": {
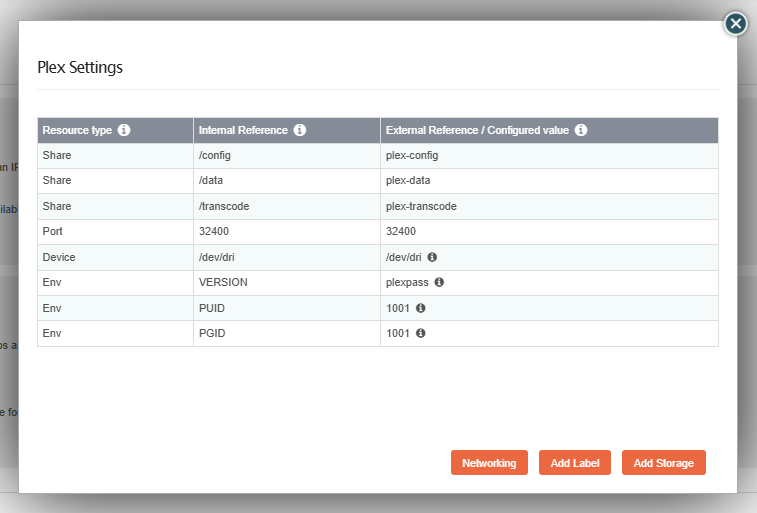
"/config": {
"description": "Choose a Share for Plex configuration. E.g.: create a Share called plex-config for this purpose alone. It is important that the owner/group specified later have full access to the share (R/W/E)",
"label": "Config Storage"
},
"/data": {
"description": "Choose a Share for Plex content (your media). E.g.: create a Share called plex-data for this purpose alone. You can also assign other media Shares on the system after installation. This share needs to have at least Read/Execute access for the user and group specified later",
"label": "Data Storage"
}
},
"environment": {
"VERSION": {
"description": "Choose version of plex: Unless you know which version to try, just type latest",
"label": "VERSION",
"index": 1
},
"PUID": {
"description": "Enter a valid UID to run Plex with. It must have full permissions to all Shares mapped in the previous step.",
"label": "UID",
"index": 2
},
"PGID": {
"description": "Enter a valid GID to use along with the above UID. It (or the above UID) must have full permissions to all Shares mapped in the previous step.",
"label": "GID",
"index": 3
}
}
}
},
"description": "Organize and stream your personal media collection of movies, TV, music, and photos anywhere on all your devices. This rock-on supports hardware transcoding (optional) via Intel QuickSync -- see <a href='https://ark.intel.com/content/www/us/en/ark/search/featurefilter.html?productType=873&0_QuickSyncVideo=True' target='_blank'>Intel ark</a> to check your processor's compatibility.<p>Additional <a href='http://rockstor.com/docs/docker-based-rock-ons/plex-media-server.html#plex-server-rock-on' target='_blank'>documentation</a> is available for this rock-on.</p><p>Based on a custom docker image: <a href='https://hub.docker.com/r/linuxserver/plex' target='_blank'>https://hub.docker.com/r/linuxserver/plex</a>, available for amd64 and arm64 architecture.</p>",
"more_info": "<h4>Adding more media to Plex</h4><p>First, add the share(s) containing your additional media to this rock-on using its settings wizard. Then, from Plex webUI, you can add this/these share(s) and re-index your library. See <a href='http://rockstor.com/docs/docker-based-rock-ons/plex-media-server.html#adding-shares-to-plex' target='_blank'>Rockstor's documentation</a> for detailed instructions.</p> <h4>Hardware transcoding using Intel QuickSync</h4>If you have a compatible processor and filled the <em>QuickSync device</em> field during the rock-on installation, please note that you also need to add a dedicated share (named <em>plex-transcoding</em>, for instance) mapped as <code>/transcode</code> that will be used for transcoding only. Then, from Plex WebUI, you can update the <strong>transcode</strong> directory setting.</p>",
"ui": { "slug": "web"
},
"volume_add_support": true,
"website": "https://www.plex.tv",
"version": "1.1"
}
}
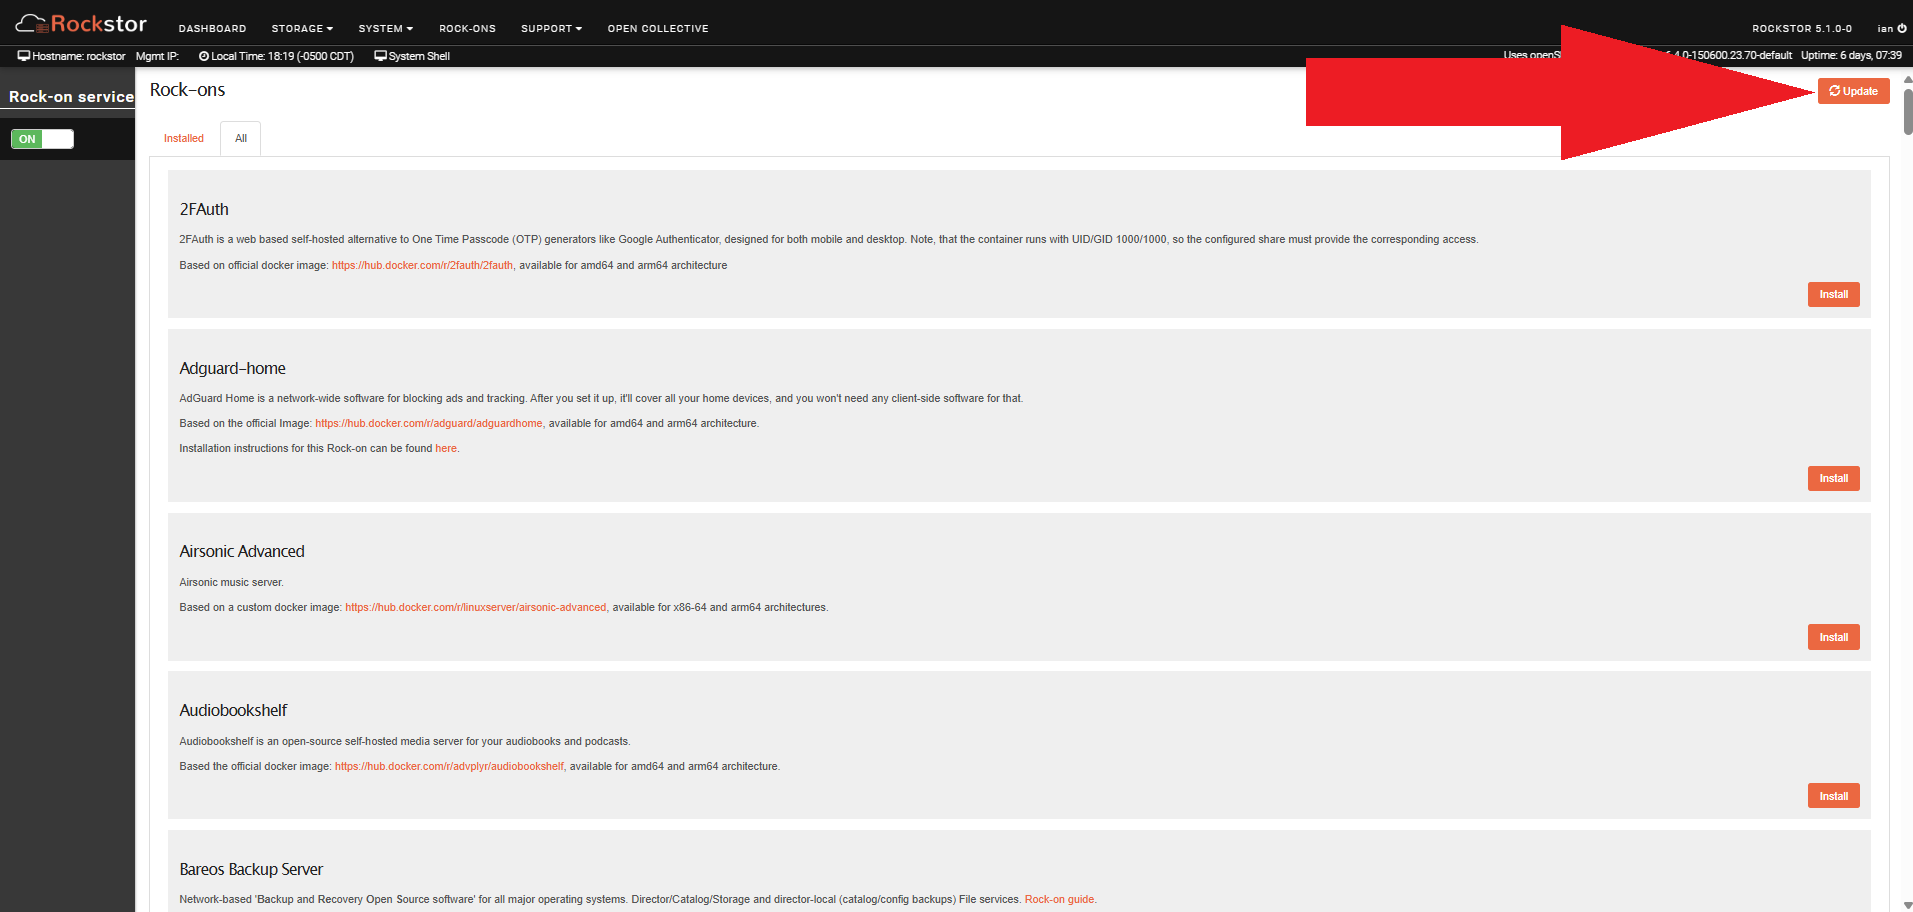
8. Now that we have our custom plex config, use the rockons webUI to update the Rock-on Registry
Once the update completes, find your local Plex-Nvidia rock-on in the list and click Install
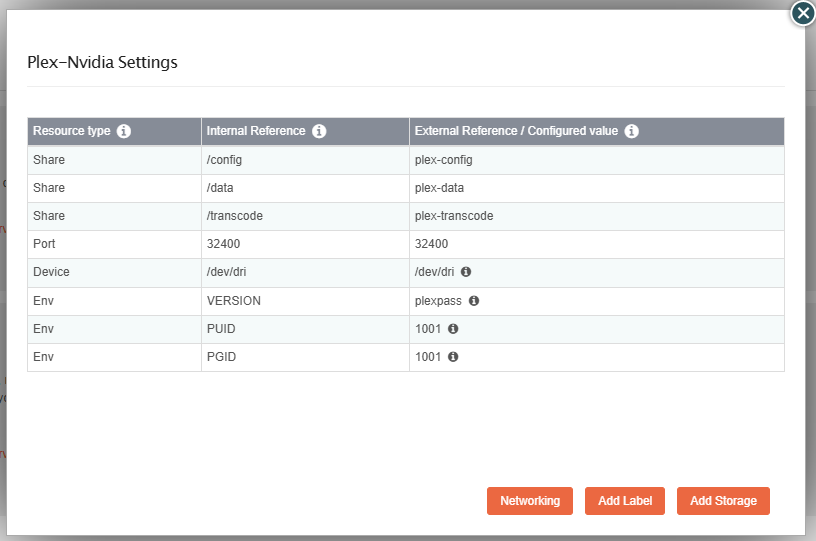
- Note, in this build, you first enter your
/config, and /data storage locations. Let the image install. Then, once plex is running, Stop the rock-on, click the Wrench icon next to the container in the webUI, and click Add Storage. This is where you add your storage location for /transcode. Remember to add this location to the plex settings under the transcode tab.
- Note, during my rock-on setup I had to enter the QuickSync device
/dev/dri/ in order for the GPU to populate in the dropdown menu inside the Plex settings page under the Transcoder tab.
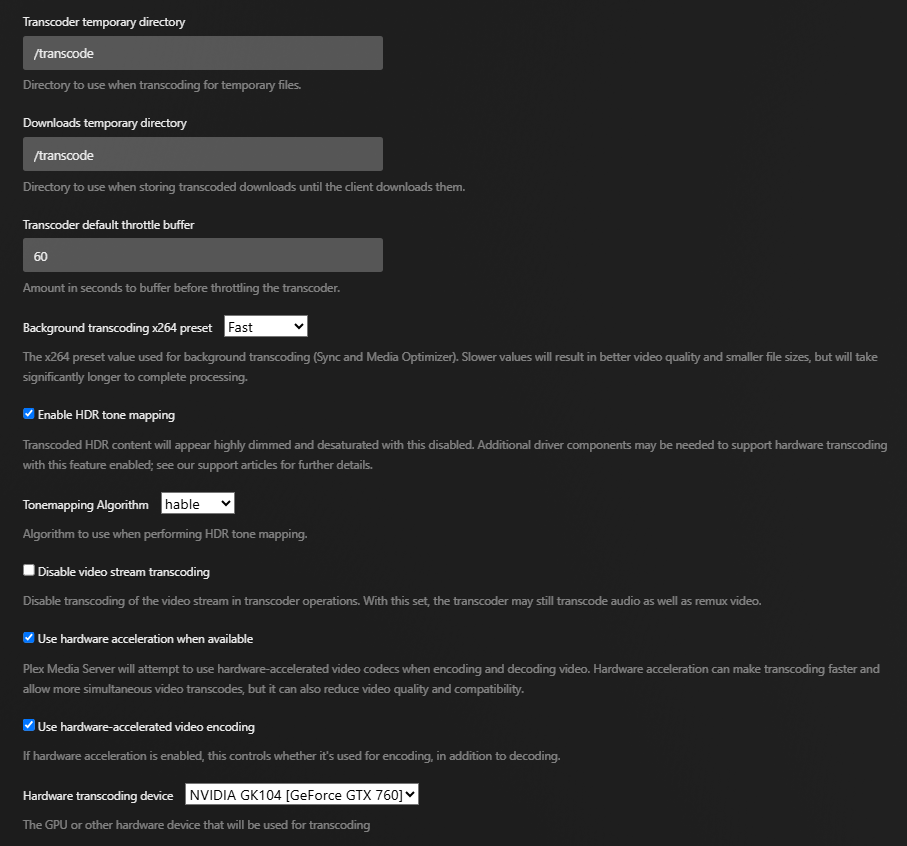
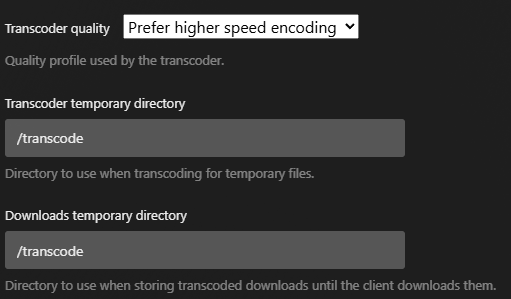
*Add your transcode directory in the plex settings. I used an ssd for faster Read/Writes:
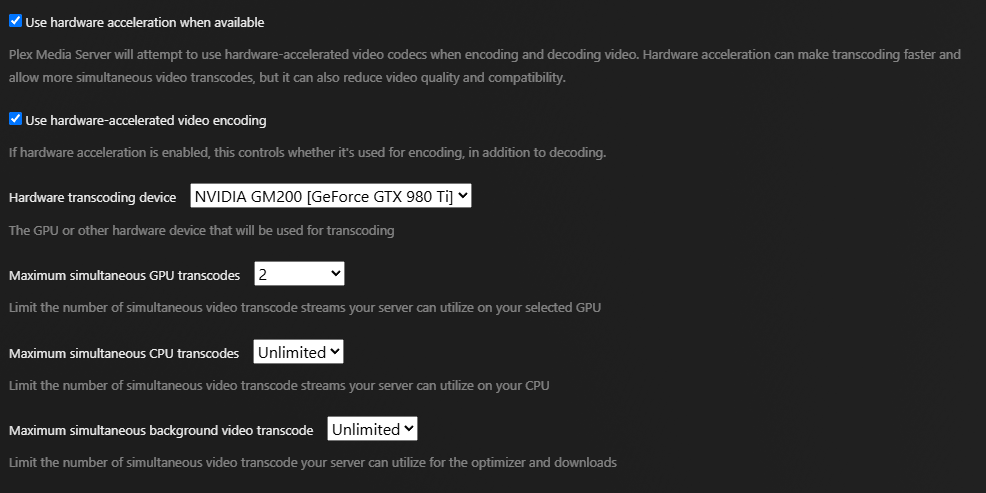
*According to nvidia’s video encode/decode support matrix, my GTX 980 Ti supports 2 simultaneous nv encodes, so I updated my plex settings accordingly:
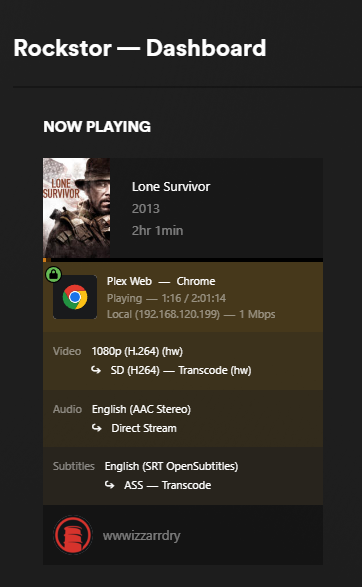
Setup Complete
Now you should be able to play a video, force a transcode conversion, and then check the Plex Dashboard to ensure the magic
Transcode(hw) appears in the stream info.
Monitor GPU activity with:
watch -n 2 'nvidia-smi'
Useful hardware queries:
nvidia-smi --query-gpu=gpu_name,gpu_uuid --format=csvnvidia-smi -alspci | grep VGAlscpu | grep Archhwinfo --gfxcard | grep Modelhwinfo --archinxi -Ga