Sadly I’m not telling you how to do it. I’m asking for help.
This NAS has not graphic interface or some way to see what’s happening neither.
It only has a serial connection that is not working well, so I can’t see anything. But it can boot from USB with some magic, and you can plug a USB keyboard to it.
I wanted to ask some of you wizards to help me making some wizardry stuff to make a bootable USB that load net services enough for connecting by SSH or anything like that to make the installer work but by ethernet connection.
Anybody can help me with this adventure?
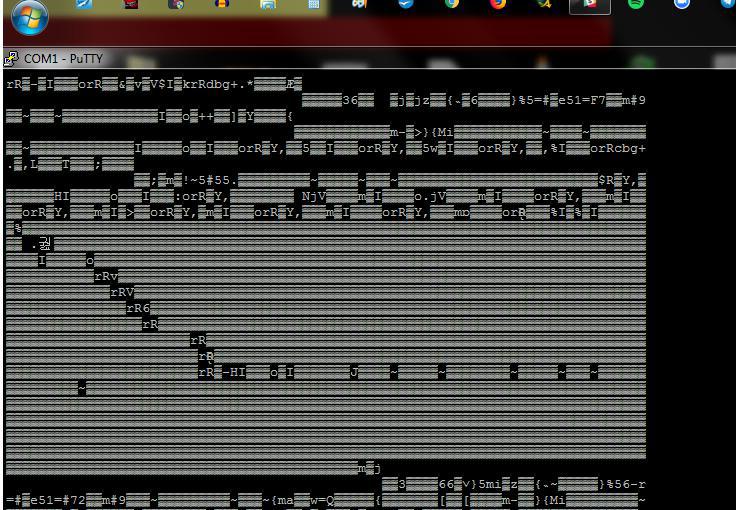
I’m leaving here the precious picture of what I see at my console when connecting with PuTTY. It makes the same in my other completely different computer:
With an Serial to USB Converter set to 3.3V and Putty (115200n8) you can access the BIOS and change the boot Device and boot from USB thumb drive. Just disable every other boot option.
I prepared the USB thumb drive with Rufus and a debian image, so that I can boot in UEFI mode.
As you only have a serial output you have to change Grub to output to the console and add “console=ttyS1,115200n8” to the boot command. Make sure to use ttyS1 and not ttyS0."
Akin to one entry in that thread I’d go the route of installing on another machine, customising the boot as required for what this machine expects, then transferring the boot device over to the DX4000. But first off you really need to dial in that serial console config.
Interesting project so do let us know how you get on.
More progress pictures as you get them would be great.
Yes, that was the first tutorial I saw about it, and it was my guide when trying with it. But nothing, it doesn’t work. I tried a lot of different configurations and didn’t work. I tried different programs too and didn’t work neither.
To be honest I’m considering to install Rockstor the same time in this one DX4000 and in other PC, and try to do it hitting the same keys in the two keyboards to make it install in the DX4000. Crazy but maybe works…
There is really no practical substitute to establishing the serial console as it gives you the bios access so I’d definitely follow that path first. You are getting some output but it’s just garbled which would suggest timings / settings, and or wiring. Ensure you have the correct usb - serial (ie 3.3V compliant as a 5V one is likely to fail in an unpredictable fashion. Some converters can do both and some have a jumper, but many are either one or the other. Also ensure correct wiring of course.
Forum tip (forum admin hat on) probably best to put several small posts into one as then we are kinder to those receiving emails for each and every post.
You might get better / more feedback on this serial console issue in hardware forums as currently this is not Rockstor related. Interesting though and would be nice to see Rockstor on that device.
Persever with the serial console first I say. Others may have alternative approaches though but you giving yourself a major task to manage without that. Plus once sorted you will have much greater control over the system.
Good luck and do keep us informed. Look forward to that serial console output and some re-usable instructions on getting Rockstor installed.
My preferred 3.3V USB to serial/ttl adapter is the following one which has worked with a whole host of devices:
Also worth trying in Linux as some have an easier time with these devices there due to driver issues on more modern windows with older chip sets in these devices.
I have a few more converters and results can vary between versions of the chip they use so it could still be your adaptor, especially given others have successfully achieved this and published their settings.
Hope that helps and that we attract more input on this one. Looks like a really nice unit.
Hello again. I used the serial port from my motherboard. Both of them have serial port. To avoid the voltage issue, I only used the Rx, Tx and Gd connections. I tried switching Rx and Tx to be sure, but nothing comes out the other way. But is true that I didn’t see anyone using any native port on their motherboard, so I’ll try an adapter.
Understood the messages thing, sorry. You are right, I didn’t thought about it.
Do you think this adapter could work well for this NAS? I like yours but I have some disadvantages to buy it at this moment:
So the voltage bit doesn’t actually work that way. There are different incompatible serial signal voltages and the 3.3V indication in that original article, and details as (3.3V I/O) in my picture are for the I/O or the data signal. It’s best not to connect a higher signal voltage to a low one as the higher voltage (pressure) member can over current / over drive the lower voltage partner. Hence the “5V safe TTL input” (Transistor Transistor Logic) note I’ve left on my adaptor. That is it can survive a partner of 5V. It remains to be seen in your NAS motherboard is able to survive the standard serial port voltage which is very different from either standard TTL levels (around 0-5V) or the lower voltage variant of 3.3V and actually lives in the range of around -15V to +15V. Note that these are signal levels not the Vcc (power) line.
You might be OK but it was a definite mistake to connect your pc serial (-15V to +15V) directly to the opposite end of the range 3.3V port. But it all depends on the protection level the put on the NAS serial. The can be quite robust.
Always have to be careful with signal levels.Sometimes you can get away with 3.3V 5V as there is some cross over but shouldn’t work between standard serial and 5V or 3.3V so at least that’s part of the explanation as to why you didn’t get a proper communication going.
Assuming the NAS serial inputs haven’t been blown out already by the standard serial connection then the following text from that devices description:
“Replace FT232 Module support 5v/3.3v for arduino”
bodes well: if they are also referring to the signal levels. I.e. it looks to be like the one I have in that it can handle 5V but also sense the lower 3.3V signals, they are not all that different after all. Also looks like a neat contraption and I like the aluminium case design. More build in shielding.
Let us know how this goes, and I hope the NAS’s serial input is good and robust. Always worth checking signal levels / compatibility when wiring signal lines together. There are many standards still floating around and they don’t all get along.
They are the only ones you need if you are not remotely powering one end. Also the Rx Tx switch was a good idea so it looks like you have that bit sorted now. If there was no change in the behaviour during your tests then the NAS port may still be OK. I.e if it initially gave some results that were later not repeatable then that might indicate a failure mid test due to over voltage. But all the same I would not re-connect that particular arrangement as it’s never going to work between standard serial (9 or 25 pin d type) and the 5V / 3.3V embedded variants such as is found on routers etc as the older one is double ended in it’s voltage, apart from of course being in a different range.
Aggg… I didn’t know it! I spent days trying with it, but as you said, it should be OK because it showed all the time exactly the same answer (I mean exactly the same characters). So I hope it’s still good. And I spent hours each day trying… If really this NAS beared it without blowing up, I will think better about WD. I know something about electronics, so I know that I could mess it at all, but I really don’t know so much about serial connections and other protocols like that.
I’ll buy that adapter and come again with news. I think it will be awesome if I finally reach to put Rockstor in that NAS.
Hello everyone. I just received the adapter and is pretty nice. I love it. Is amazing. And it works well.
So I’m trying now to install Rockstor on it. I have been failing for a while, until I remembered that this NAS don’t admit any pen drive that’s not of 16 GB. YES, any other size doesn’t work. So I marked inside it a remember with a marker saying “Use 16 Gb memory”.
I used this amazing command in Debian for making my USB installer on my 16 Gb USB drive:
Notice the |pv| option, is pretty good to know something when a command doesn’t show a single thing.
And… nothing happens. I don’t have even a clue about if it is working or not, as after showing as it will boot, stays showing nothing and stays there. I think that maybe is booting but showing things by some graphic interface that this thing has not.
Is a good idea using a kickstart file to force it to use the serial way for installing? Is this possible?
But I don’t want Arch, I want Rockstor… I will go deeper into this one until a better answer, as I think is the best path by now.
I just took that deep look some minutes ago and found that the issue was the partition table of the USB drive. As the .iso image changes it, I had to format it into GPT and copy all the files to a new NTFS partition into the USB drive. That, after some kind of weird attempts, finally works. And it seems to boot perfectly, but after the bootloader I can’t see no thing.
Tomorrow I will try to find the way by the boot options to make it work by tty console or something to make it work at all.
@leondante Thanks for the update and glad your serial access is now sorted.
I wondered on your pre edited post about the Rockstor’s iso format given the last referenced article has:
“Make sure that your “Partition scheme and target system type” is set to “GTP partion scheeme for UEFI” (without this option your USB will never boot)”
But to know exactly where you are up to I think it would help to see a picture of the last thing you have access to; ie to clarify:
So are you seeing Grub and Rockstor’s kernel options? In which case you may need to add a serial console output option to the kernel command line. Or if pre grub (as I suspect) then it may be you have to edit the iso image to include a grub config option to output to the serial: ie as per:
martinmeise’s advise in that same earlier sited thread:
“As you only have a serial output you have to change Grub to output to the console and add “console=ttyS1,115200n8” to the boot command. Make sure to use ttyS1 and not ttyS0.”
Once you get that far we can look to selecting the text only install option within Anaconda (our upstream CentOS installer) given you will only have a text output (via the serial).
Well done getting this far. Bar the iso image edit or possible build from scratch (see: rockstor-iso) you look to be on the home run.
So are you seeing Grub and Rockstor’s kernel options?
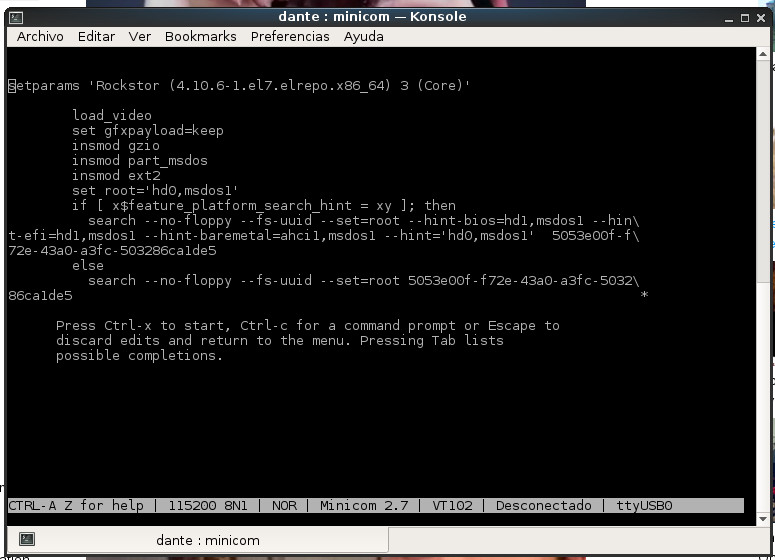
I reached the GRUB with the kernel options, so I tried this:
“As you only have a serial output you have to change Grub to output to the console and add “console=ttyS1,115200n8” to the boot command. Make sure to use ttyS1 and not ttyS0.”
But it didn’t worked. I’ll try again that way and look more info about it.
Can you tell me more about this? I lack all information about it:
Once you get that far we can look to selecting the text only install option within Anaconda (our upstream CentOS installer) given you will only have a text output (via the serial).
Hope soon it works. I want to play a little with it. I’ll check that about making my own customed .iso.
I tried this, over ‘load_video’ and wiping that option too:
console=tty0
console=ttyS1
console=ttyS0
console=ttyS0,115200n8
console=ttyS0,115200
…and other ones without result more than a black screen with the bar waiting doing nothing. But it responds to one fast push to the power button, so ACPI is working, so I think that is loading the installation program.
Pretty sure the “console=ttyS1,115200n8” was suggested as a potential requirement for grub to appear on the terminal. I think we need a picture of where exactly you are getting to.
You will have to look up the required equivalent for the kernel options, if in fact they are required. You may not be booting the rockstor grub but another created by your method of making the usb key.
Lets see a picture so we are not so in the dark with exactly where you are getting to. Looking promising though. But I’m afraid I haven’t done this exact procedure so we will have to muddle through but I’m just not sure where you are at currently.
Before this, I go through the BIOS to override boot loading to my USB drive straight, as it has not boot menu to go there. (Yes, I don’t want to set the USB as first boot option.)
Is this enough? If not, I don’t know what you mean with ‘where I am exactly getting to’.
To make my USB drive, I set the partition table to GPT and make a partition NTFS inside it. After this, I mounted the .iso of Rockstor 3 and copied everything (even hidden files) straight to the USB drive. I didn’t used any kind of tool for it.
@leondante Hello again. My current suspicion is that your usb boot drive is not quite right just yet.
I don’t know but it seems that as people are using either Rufus or Etcher to get:
“… a proper UEFI boot …” so I’m assuming if that’s the case then your usb key could be tested on another UEFI capable and enabled machine to check that it’s correct. Also I thought that a UEFI partition had to be FAT32. Just not sure if you made your USB key correctly. I suggest that you try it out on another regular computer first as the you can rule out that element. Or try other methods of making the USB boot device you know work on other UEFI boot systems then try it on this machine as you need to rule out that element first.
We really need someone who knows more on how this disk has to be made to chip in here really.
Then once we have that bit done we can move to why it’s not going any further once you have selected the Rockstor kernel.
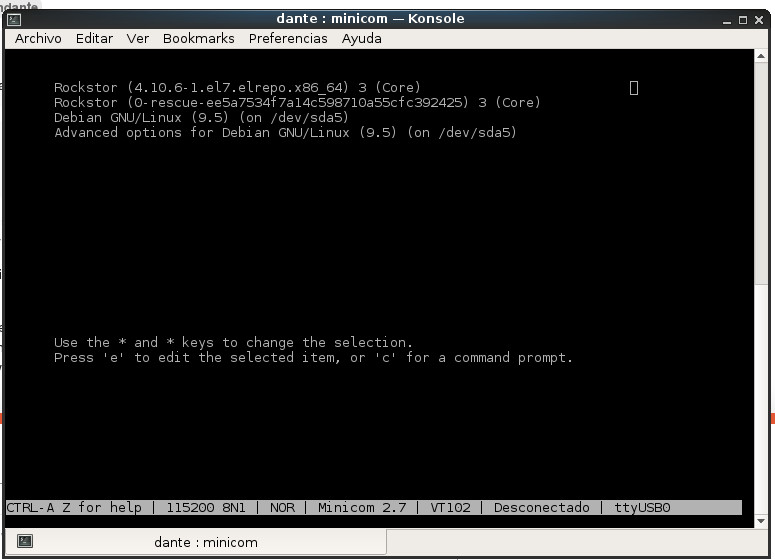
Also why is a debian boot option showing up here?
Sorry to not be of much help but creating a properly formatted USB key can be tricky and it may just be that.
Great that you are at least getting as far as Grub though.
I just had one kind of ‘success’. If I type the word ‘text’ at the end of the boot options when changing them in the GRUB installer option, it shows ‘Press any key to continue…’ after running it, and goes ahead, showing nothing. This is like so pretty slow, but maybe in ten years I will achieve to install and run it correctly.
Rockstor was installed in the disk all this time, from start.
My first attempt was to install it at my desktop PC in the disk I wanted to use in this NAS and then try to run the hard drive inside it.
I failed to boot it, so I left it as a failure.
Then I made the USB installer and tried to boot from the USB, but the GRUB I was looking at was the one from the HARD DISK, not the one in the pen drive. That’s why there was a ‘Debian’ option to boot. When I was installing it, the GRUB was set up to boot my Debian at my desktop PC too.
So… When I found that the USB drive was not booting and that I was looking at the Rockstor installed previously, (was because this little pebble needs a 16 Gb and UEFI ready bootable USB installing disk, and mine was not working as UEFI…) I started the way to try to access it.
Long story short, if you install it in other PC and later use that disk in the headless NAS, it works. I access using the https and IP address and set up it and it works, finally, after a month…
I should warn to whoever read this about this NAS doesn’t look like working when deactivating UEFI in the BIOS, it will not boot any non-UEFI USB disk. And I think is mandatory to change some things in the BIOS in order to boot correctly the disk you just installed Rockstor in (you must choose manually which disk you want to boot).
Hope this way of hell I went trough could help someone in the future.

 then the following text from that devices description:
 If really this NAS beared it without blowing up, I will think better about WD. I know something about electronics, so I know that I could mess it at all, but I really don’t know so much about serial connections and other protocols like that.