Rockstor as a Virtualization Host Made Easy – Setup Guide Using KVM/QEMU & Cockpit for Running & Managing Virtual Machines

Introduction

Having the ability to run some virtual machines (VM) on top of Rockstor is a frequently requested feature, especially when comparing Rockstor to other NAS operating systems (OS).

I deeply respect the decision of the Rockstor development team to focus on the BTRFS RAID & NAS functionality without providing another VM interface and exactly for this reason - being the only NAS OS utilizing the unique advantages of BTRFS to it’s fullest potential - I do use and love the Rockstor OS.

With the upgrade to Rockstor built on openSUSE 15.6 it is easier than ever to add this VM functionality on top by installing some stable packages from default repositories that transform Rockstor into a full-fledged Virtualization Host including a web-UI for managing & interfacing with the VMs.

Prerequisites

This is a tutorial using (1) kvm/qemu as virtual machine hypervisor and (2) cockpit web-UI as management interface.

Each of these tools can be installed and used on it’s own. While it was with earlier Rockstor versions already possible to use kvm/qemu for virtualization on Rockstor, it is cockpit that was not supported in previous versions of openSUSE Leap and therefore requires a Rockstor version that is is built on Leap 15.6.

All following commands must be executed in a shell (e.g. SSH or via Rockstor web-UI: System > Shell) as root (e.g. (a) logging in as root, (b) typing su to become root or (c) install sudo manually zypper in --no-recommends sudo).

Note: If sudo is not installed manually on Rockstor, then the sudo from all following commands must be omitted.

Software Installation

Install the following 3 packages - no need to modify / add any of the package repositories

sudo zypper in --no-recommends yast2-vm cockpit cockpit-machines

KVM/QEMU Setup

Use the yast2 tool from openSUSE to set up a virtual machine hypervisor:

sudo yast2

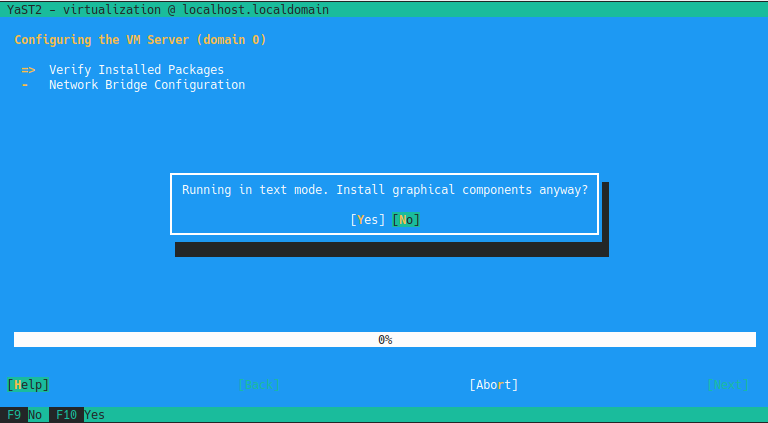
Then select “Virtualization” (on the keyboard use the down arrow and confirm with Enter) > “Install hypervisor and Tools”

In the next screen select (Tab to cycle through the options and Enter to select the checkbox) “KVM server” and “KVM tools”

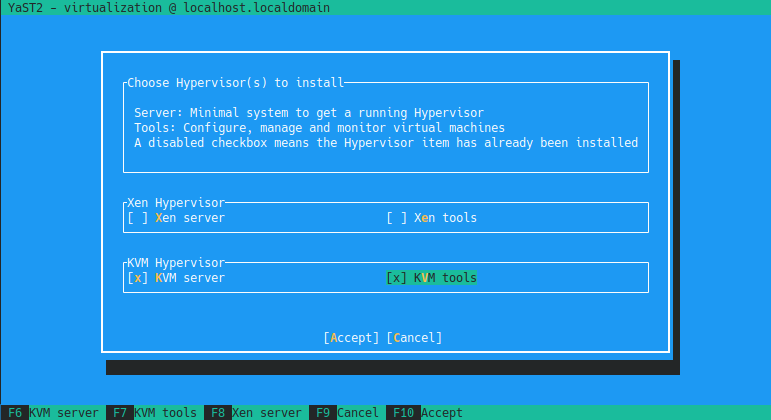
Then you are asked about installing graphical components - as they are not needed on a server, select “No”

During installation there will be a warning reading:

NetworkManager is being used. Bridge configuration must be done manually

=> this is fine, simply confirm with Enter

When finished, quit yast2 by pressing the F9 Key


To allow your (Rockstor) user to manage the VMs, add this user to the libvirt group by replacing <username> with your username in the following command:

sudo usermod -aG libvirt <username>

And reboot your machine for the group modification to take effect (either now, or at some point before using cockpit for setting up VMs)


Additionally, the modular libvirt deamons (which are used by openSUSE Leap 15.6) must be enabled manually:

for drv in qemu network nodedev nwfilter secret storage
do
 sudo systemctl enable --now virt${drv}d.service
 sudo systemctl enable --now virt${drv}d{,-ro,-admin}.socket
done

Cockpit Setup

The cockpit socket just needs to be enabled with:

sudo systemctl enable --now cockpit.socket

Bug-Workaround - Cockpit Version 321 (as of 27. September 2024)
There is currently a known Bug in the openSUSE cockpit package regarding the change of the cockpit username. I assume this will be fixed in the next weeks.

Symptom: the cockpit web-UI will not load and the cockpit.socket is stopped after one tries to connect to the web-UI

As a workaround, modify the lines of /etc/nsswitch.conf to the following:

passwd:         compat systemd
group:          compat [SUCCESS=merge] systemd
shadow:         compat systemd

End of Bug-Workaround
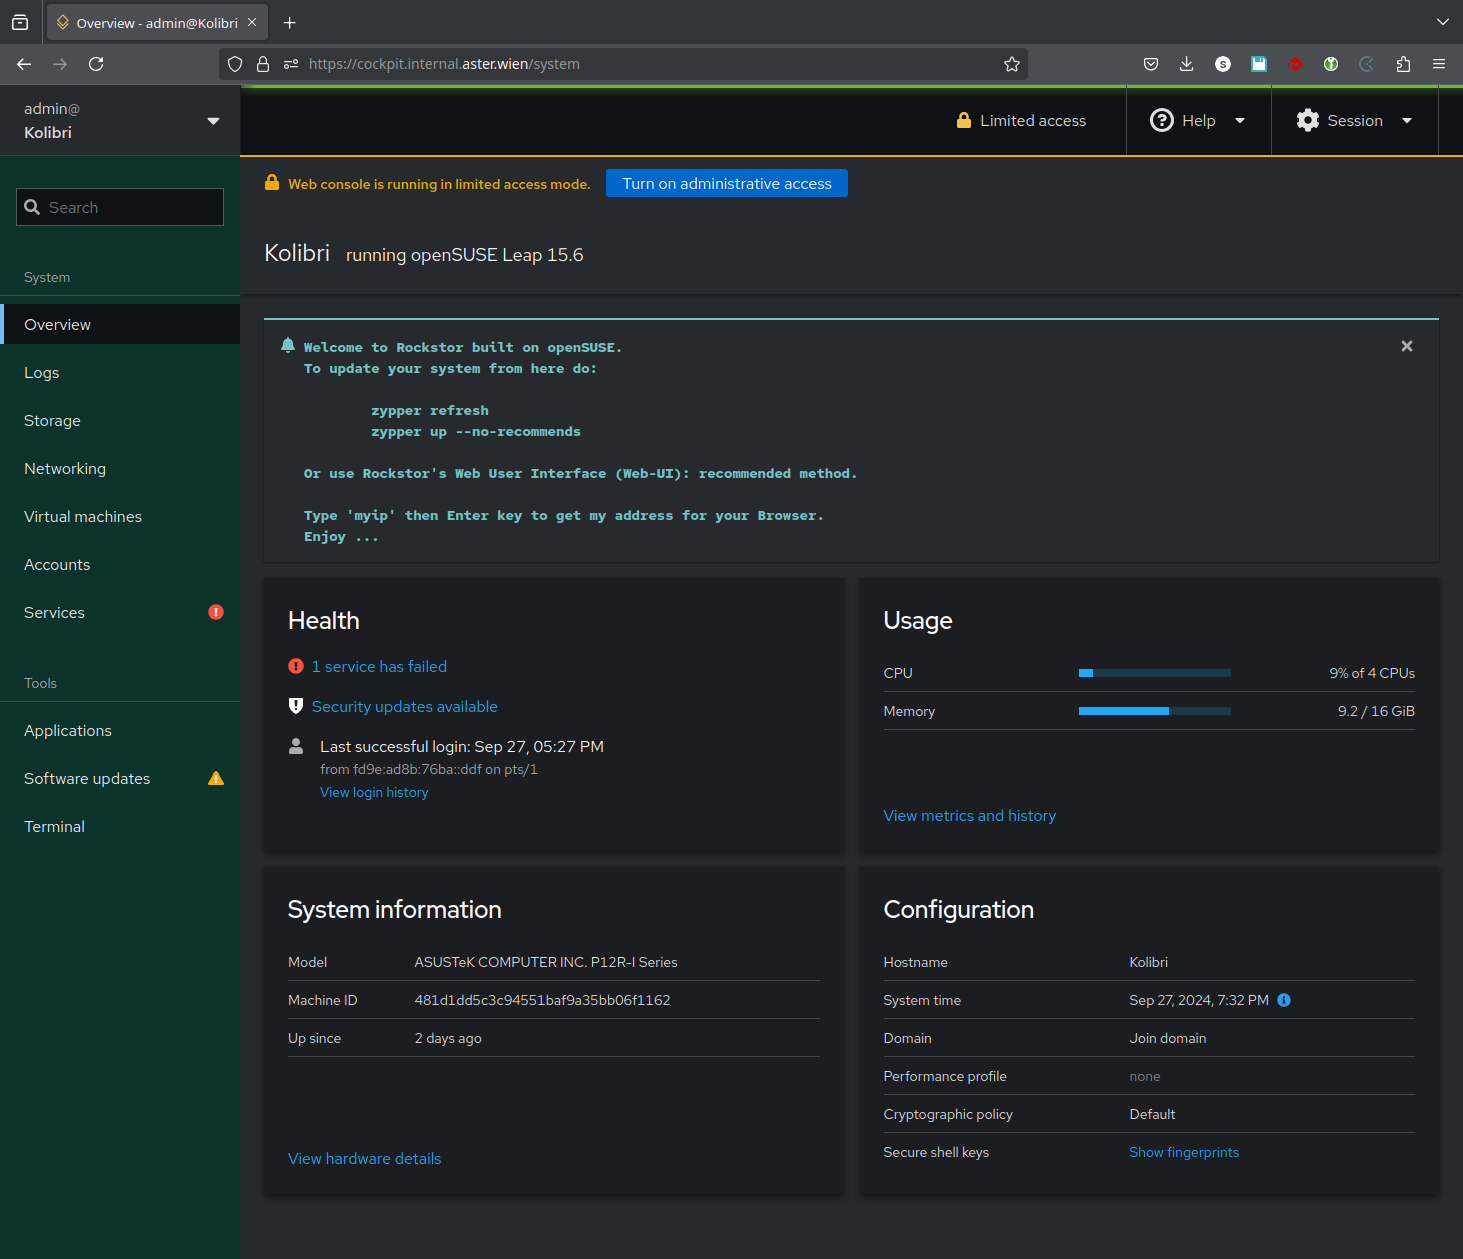

Cockpit Web-UI

That’s it with the “hard” part, we now have (additionally to the Rockstor web-UI) the cockpit web-UI for managing all kind of OS related things, from Services to Virtual Machines and an extensive List of Cockpit-Applications to chose from.

Connecting to the web-UI

Connect to cockpit via port 9090 (the same way as accessing Rockstor web-UI, but with :9090 appended) - e.g. in your browser type: https://<ip-addr>:9090

Cockpit will force you to use HTTPS and you therefore have to accept the self-signed certificate.

On the log-in page use your Rockstor username & password to log-in


There are many different resources about using cockpit including official guides from SUSE Linux Enterprise and Redhat (web console = cockpit)

Set-Up a Virtual Machine using Cockpit

Network Configuration

Remember the warning about the bridge configuration? We now have to recreate the bridge network from the cockpit web-UI:

  1. after logging-in, turn on administrative access by clicking the Symbol: “:lock: Limited Access” and enter the root password of rockstor

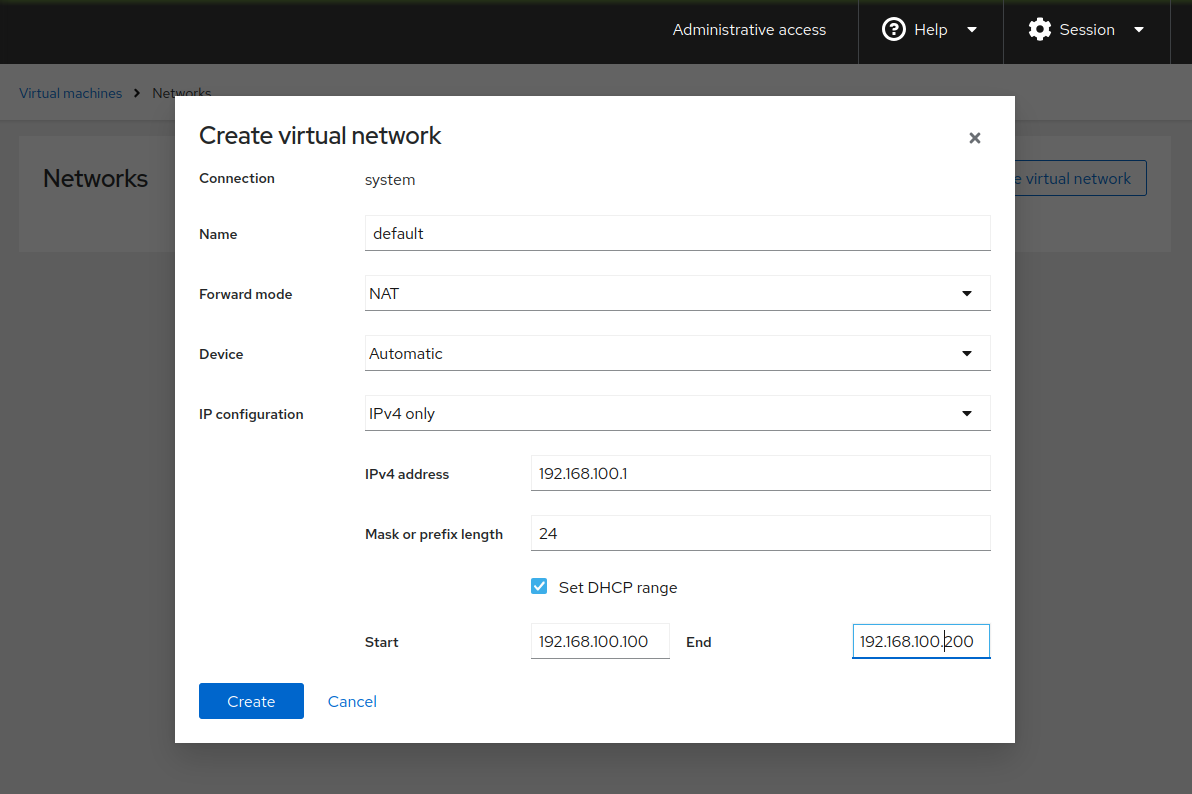
  2. select Virtual machines > Networks > and delete the “default” network

  3. click “Create virtual network” (which is only possible with Administrative access) and to make your life easier call it “default” again, keep the other fields at their default value but enable DHCP and set a sensible range - e.g.:

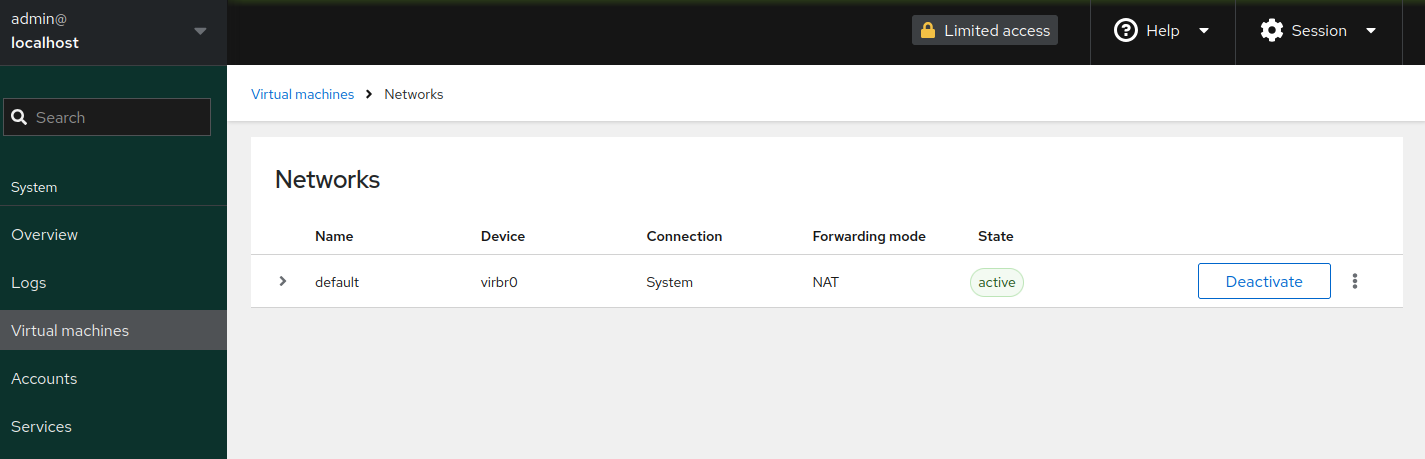
  4. press on “Activate” and confirm that the State has changed to active

  5. optionally set “Autostart” for this network by expanding the network in list-view with the small arrow on the left and select the according switch (“Run when host boots”)

  6. you can now switch back to limited access by clicking on “Administrative access” in the top bar.

Create VM

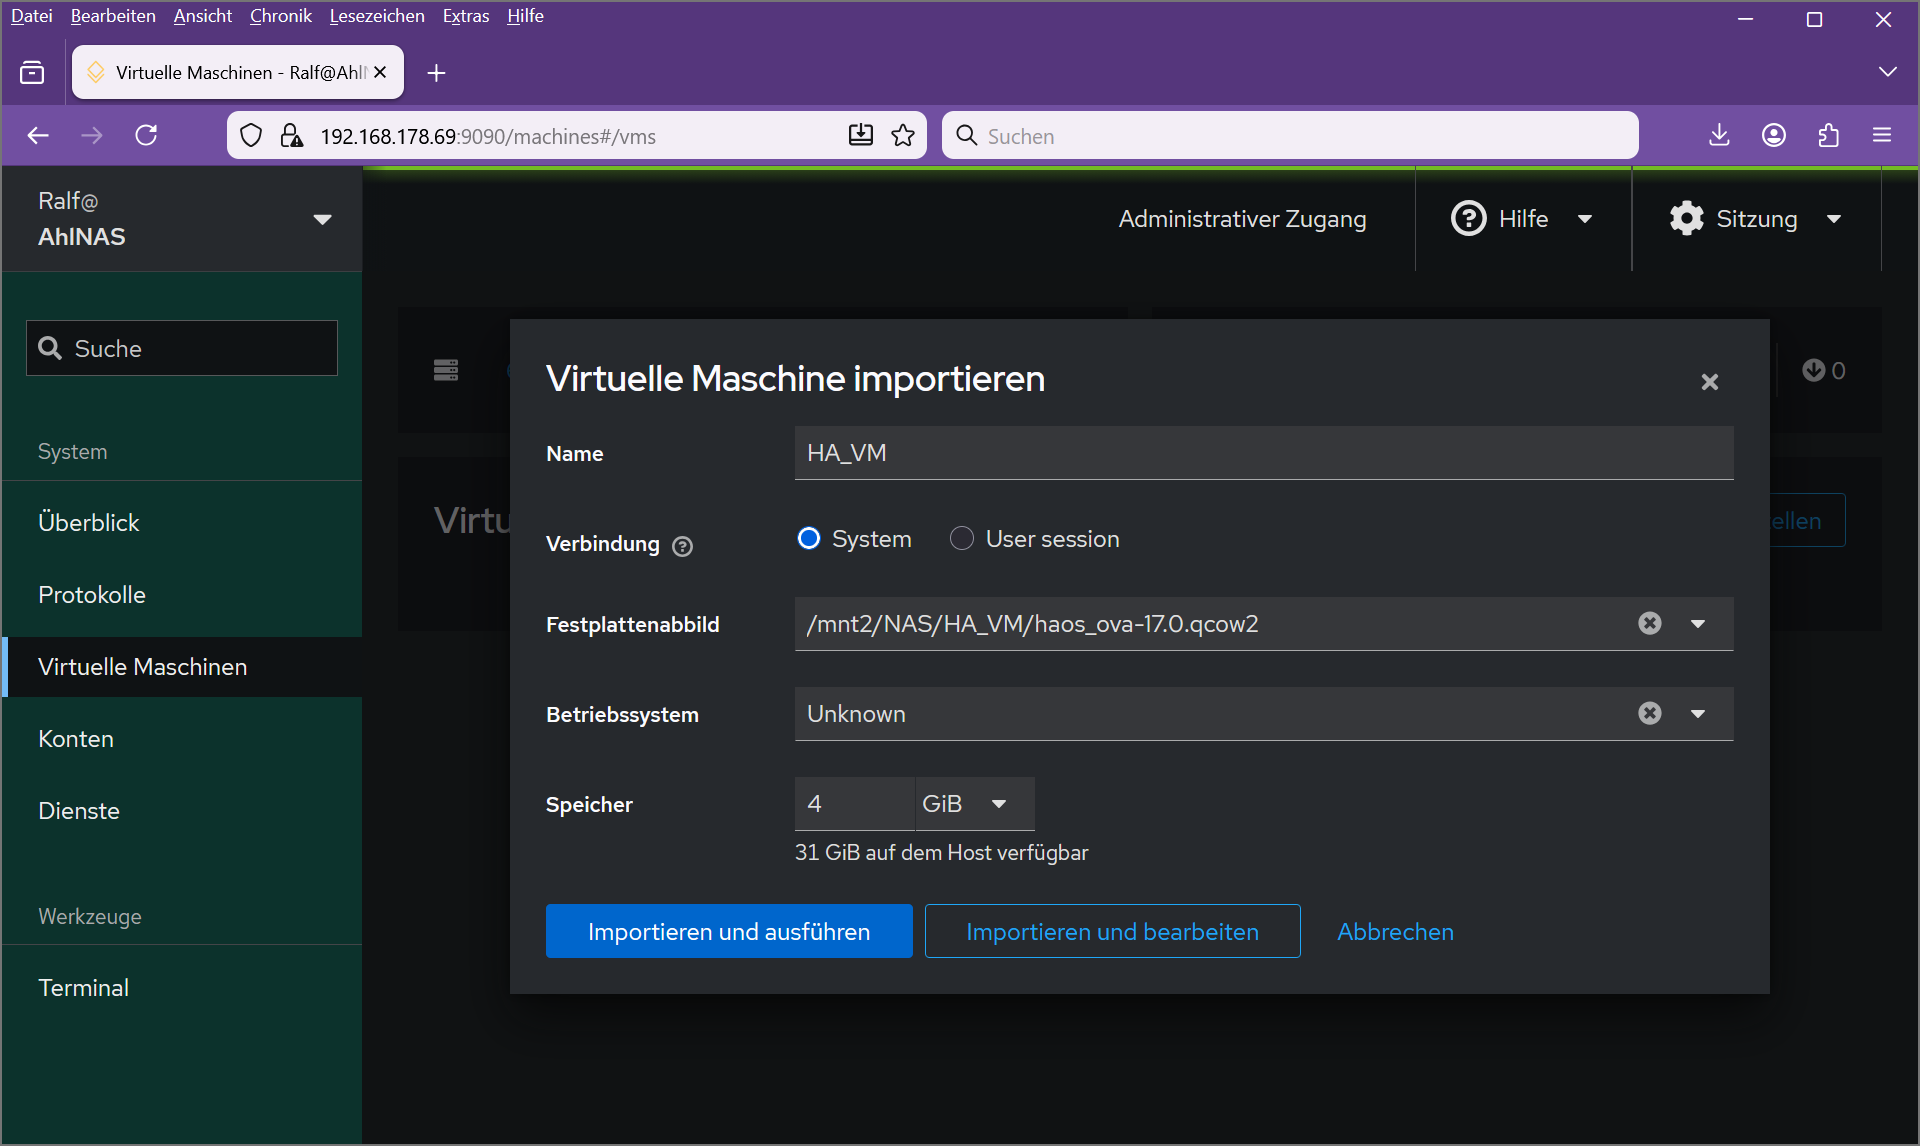
Select “Virtual machines” > “Create VM” to set up a new VM:


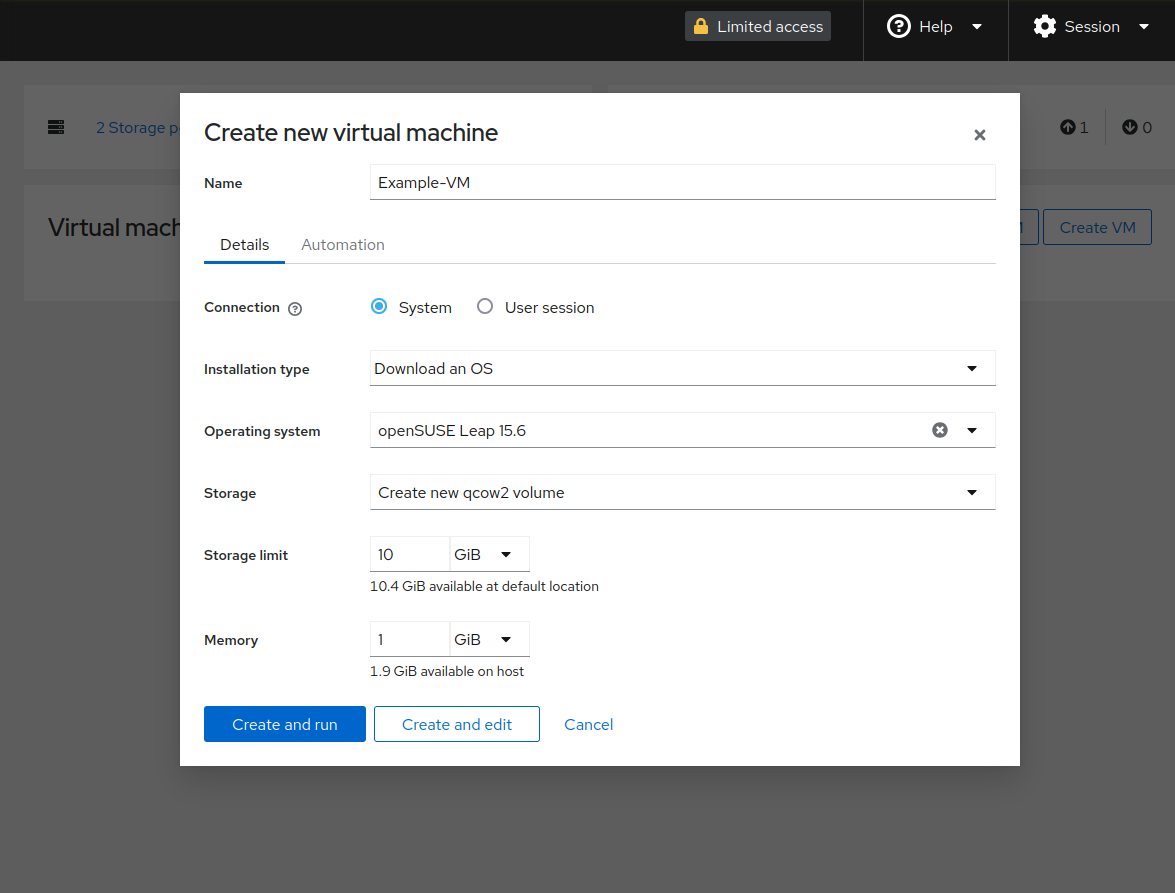
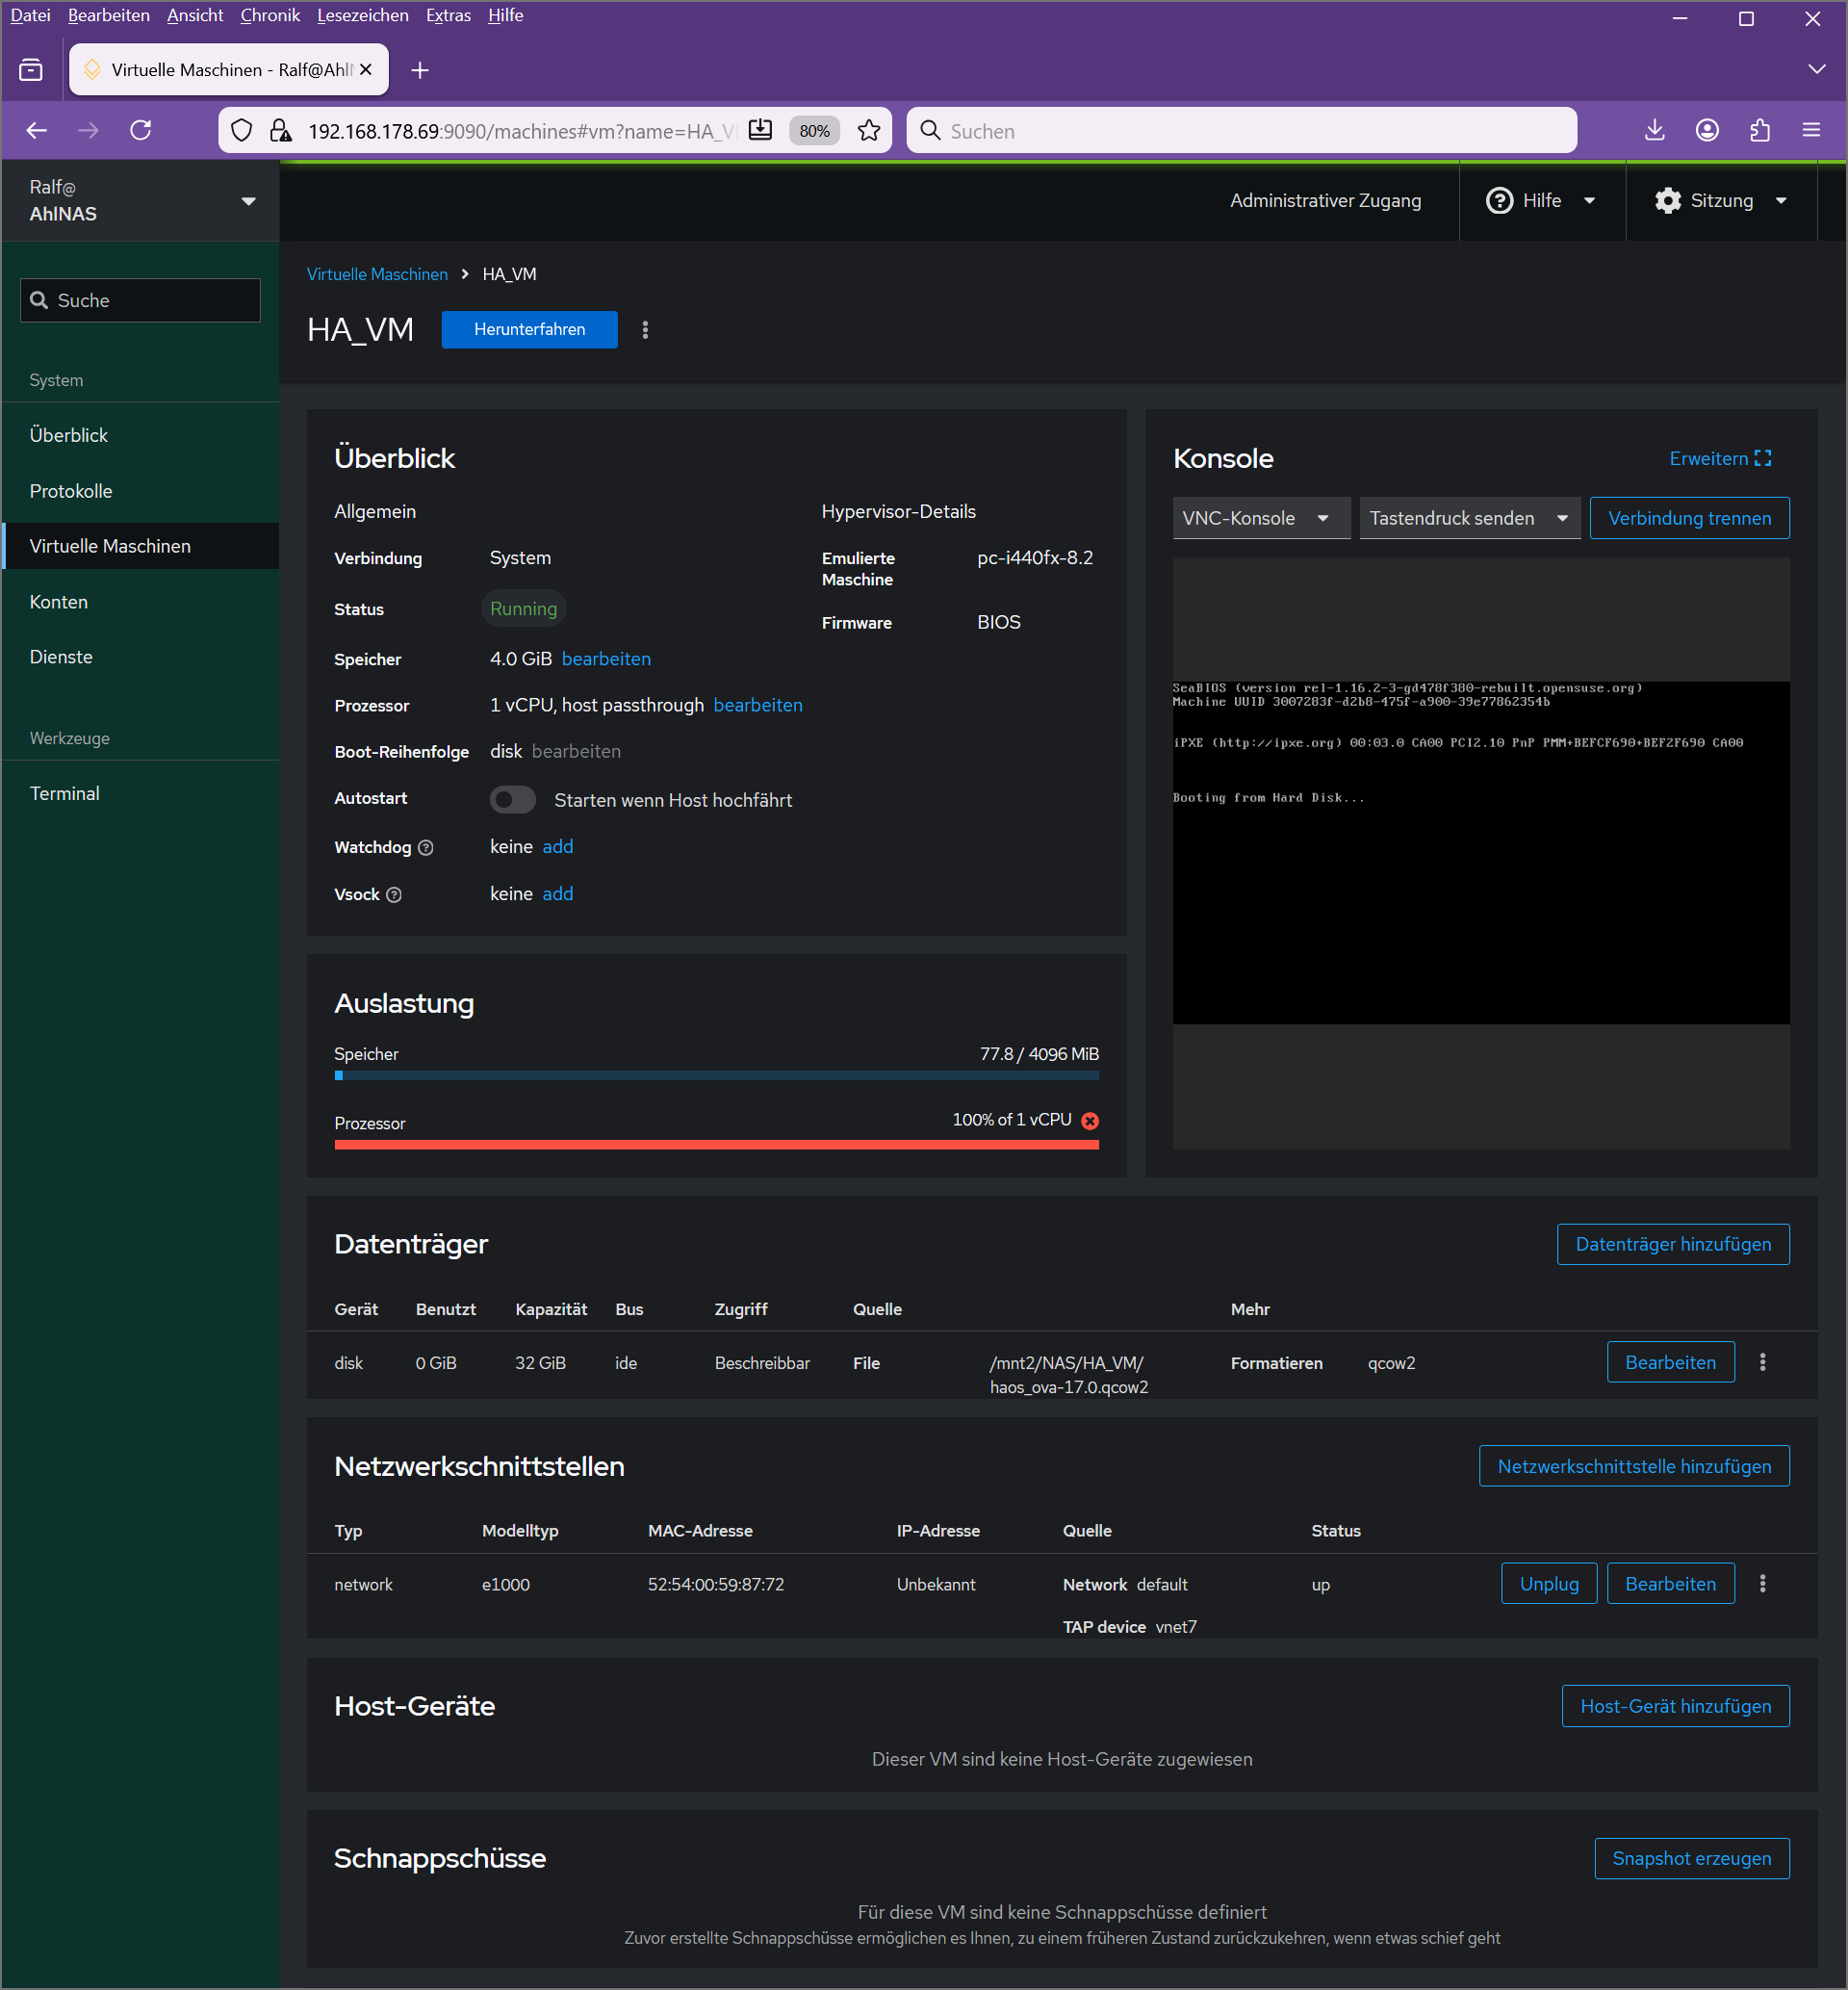
Click “Create and run” to start up your VM with default settings or press “Create and edit” to modify advanced settings like virtual network interfaces and CPU count.

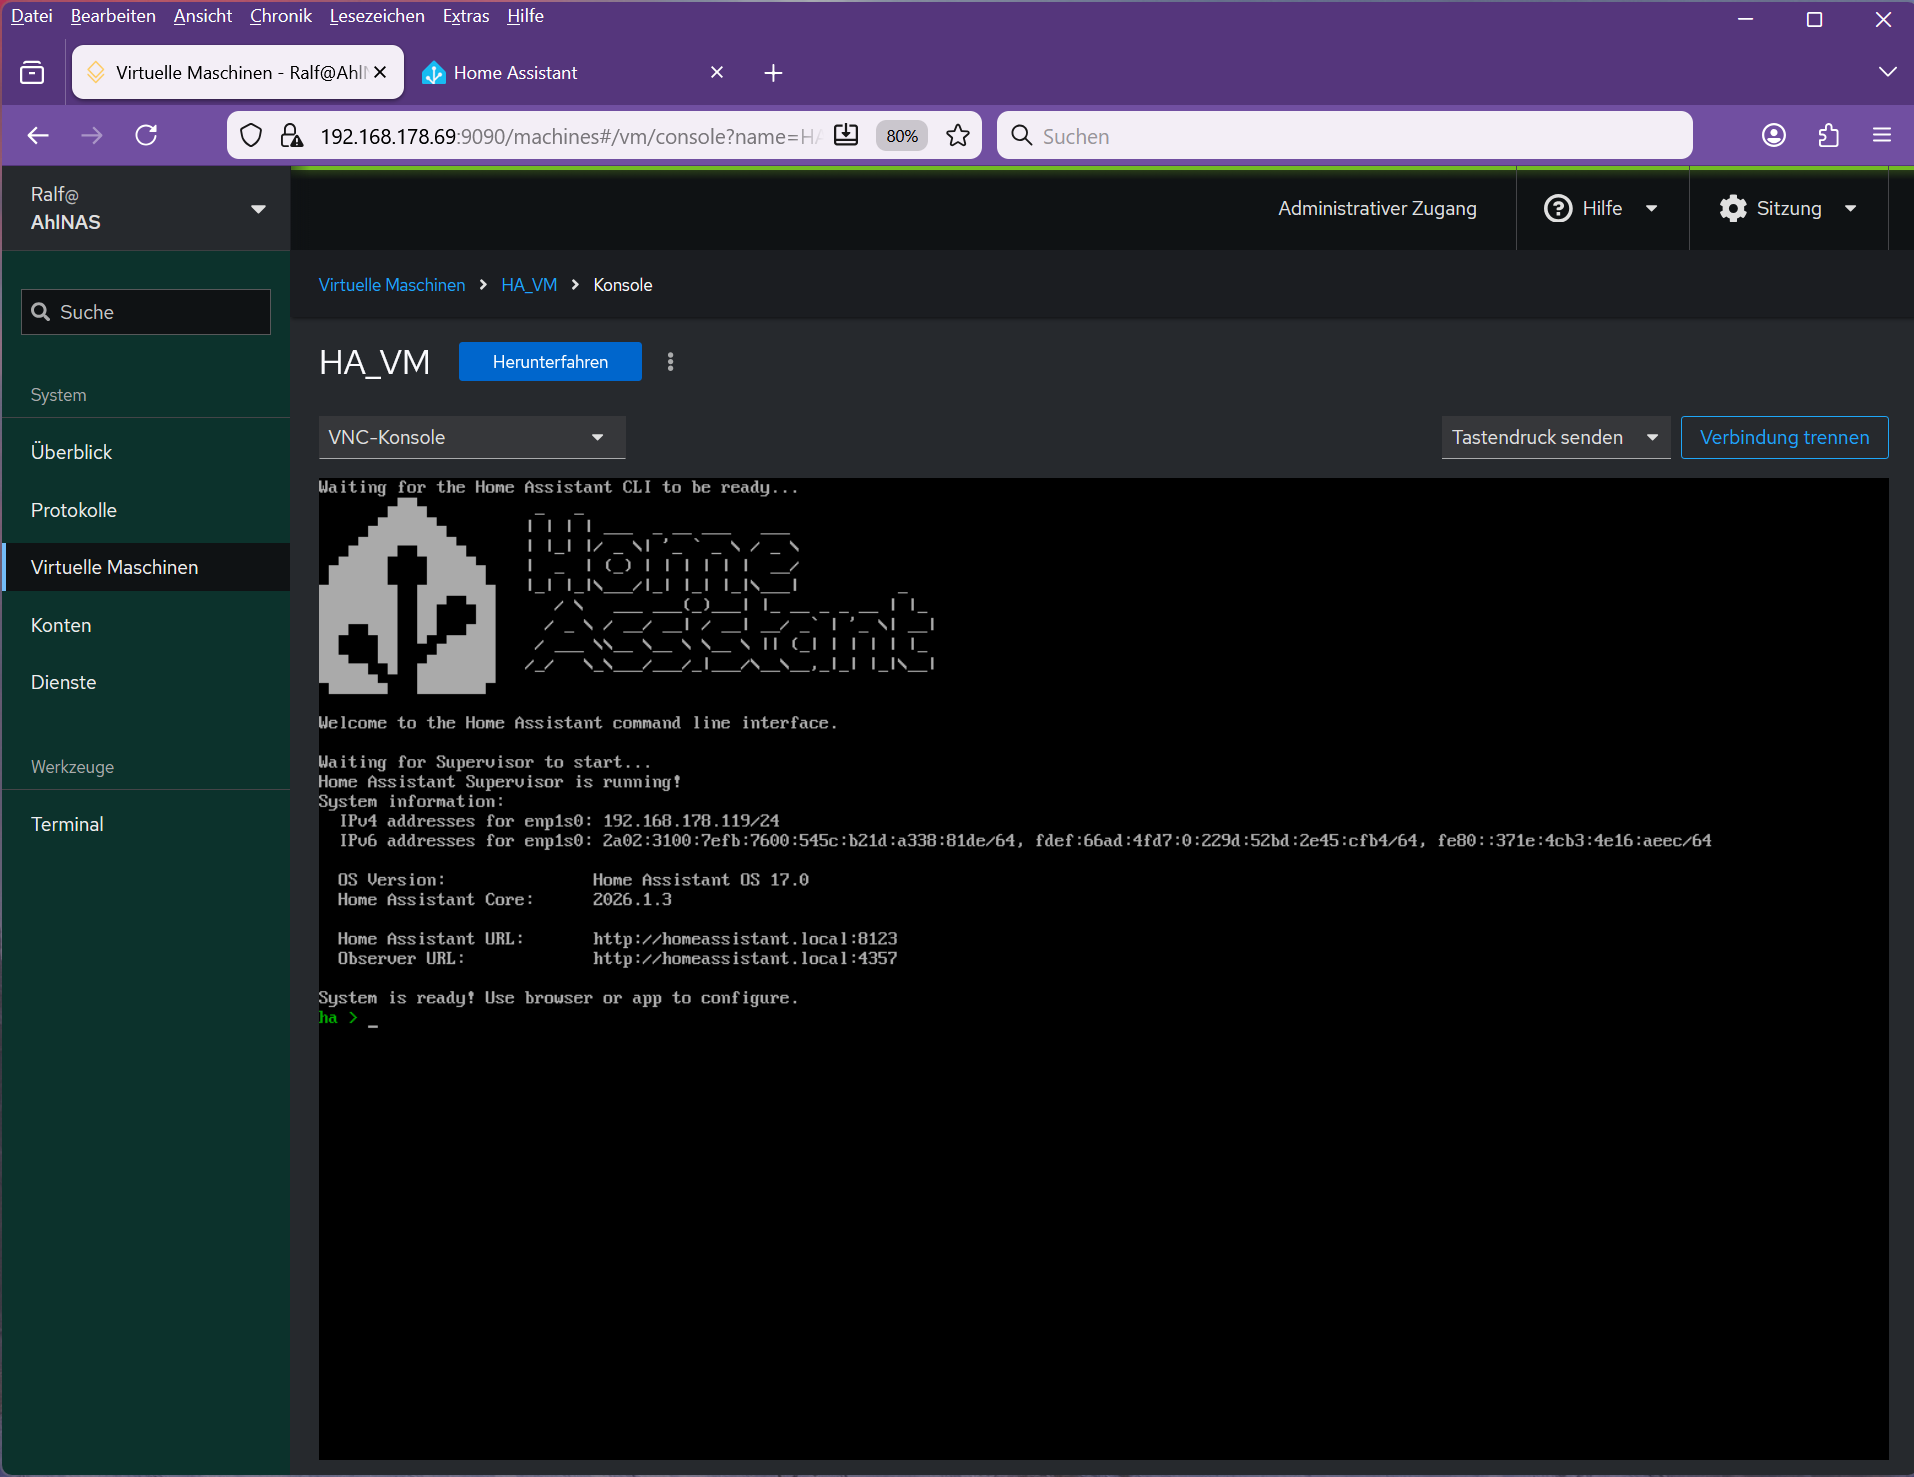
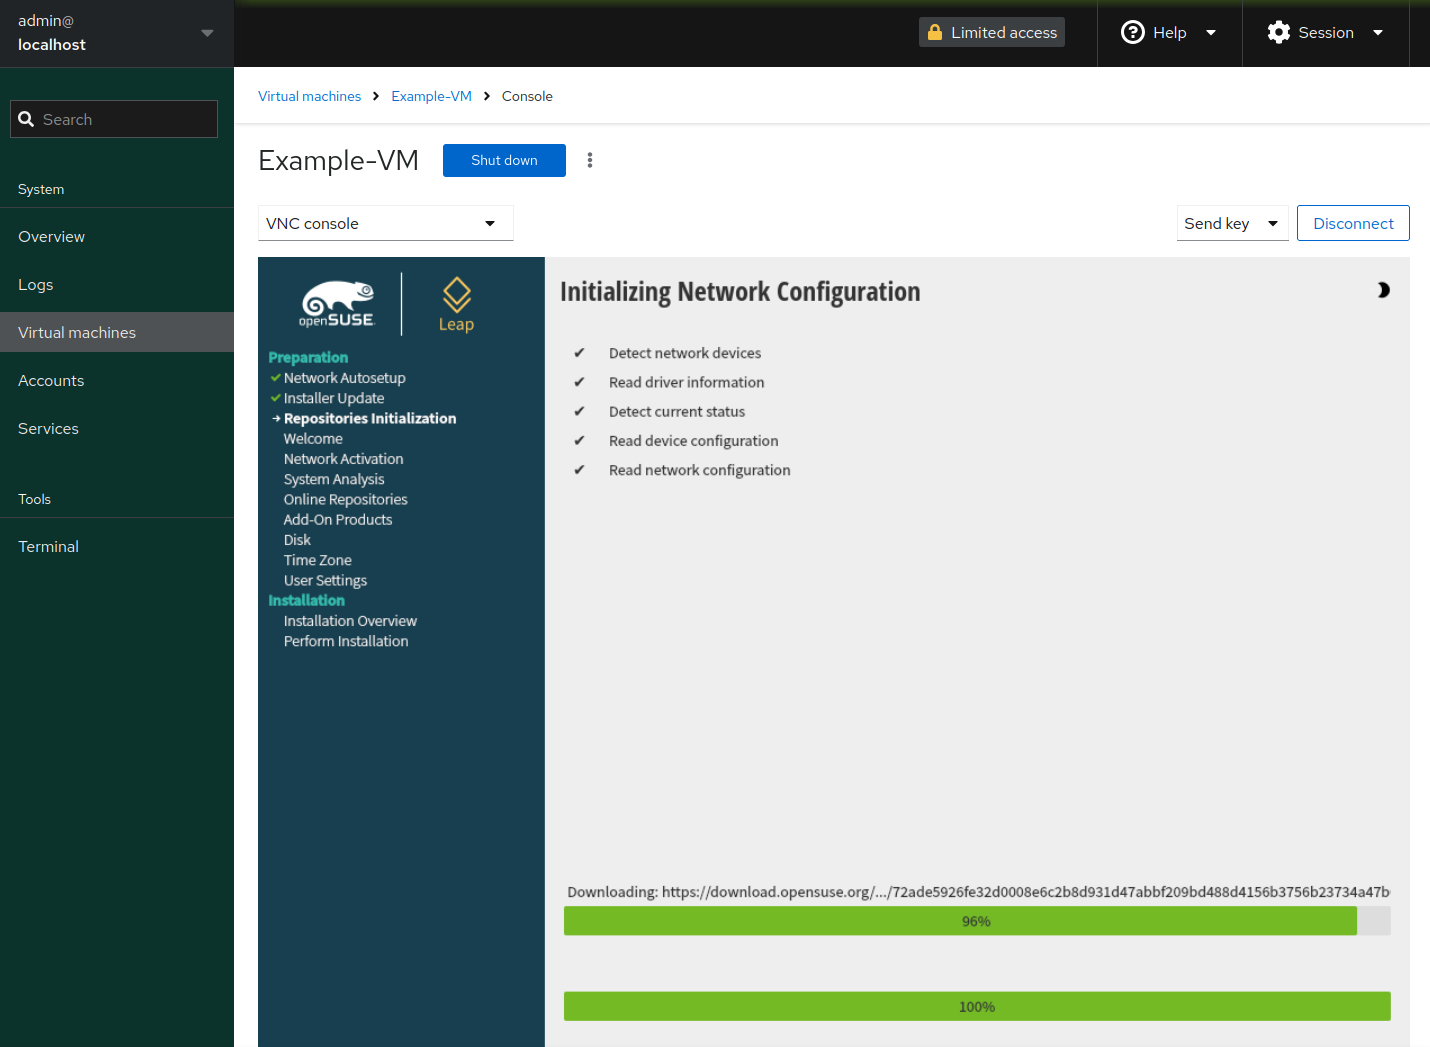
After starting up the VM, you can use the integrated Console to connect to the VM

Congratulation, your Rockstor server is now also a great Virtual Machine Hypervisor :partying_face: :tada: - have fun

Cheers
Simon

5 Likes

Outstanding! Will it run like a minimal Winderz 7 or 10 OS? How is disk space allocated for the OS?

I ask because the current Folding@Home Rockon doesn’t seem to work anymore…

:sunglasses:

Yes, it should, depending a bit on what you have available on CPU/Memory and the likes (I’ve just done Win10, albeit using Ubuntu as the host. Win11 is possible too, but depends a lot on what host CPU one has, TPM can be simulated successfuly in the guest, though).

What do you mean by your question on disk space allocation? You would define how big the virtual HDD needs to be (e.g. 60GB), but you can then also pass through physical drives for, say, data - and format them in ntfs (which would also be readably by the Linux Host (with the ntfs driver installed).

Do you want to open a separate thread describing what doesn’t work on the Folding@Home Rockon anymore?
(Update: I opened an issue on Github and submitted an updated Rockon PR, after reading the documentation: Breaking Changes on Folding@Home Rockon · Issue #431 · rockstor/rockon-registry · GitHub)

2 Likes

Well, all the space on the Raid-10 setup is assigned to a pool. I’m guessing now the VM would run on the OS SSD rather than off the Raid-10 stuff, but the SSD isn’t big enough to run a Winderz instance and last more than 6 months. The SSD would probably need to be upgraded to maybe 1TB to survive the write rate for any length of time. What I am thinking is that the VM stuff could be loaded onto my NEW (in progress) updated NAS with say Winderz 10 so I could run two separate programs; BOINC and F@H. Possibly, I could make it run with a GPU as well… have to look into that. BUT, the setup would be complicated as opposed to just running a RockOn.

My problem the F@H RockOn is after the 15.6 update, it would not run. Erasing the RockOn stuff and reinstalling would seem to work, but it would never start.

I’m a hardware guy and leave all the software up to smarter-than-me folks, so I haven’t tried it again lately… So many things could be done with a Winderz VM though… temp,CPU,hardware, processor monitoring etc…

:sunglasses:

(ignorance showing! LOL!)

This morning, the new version for Folding at Home Rockon was merged into production, so if you delete what you have and update the list of Rockons you will see the updated version …

1 Like

Thanks Hooverdan!!! Soon as my new 1TB SSD arrives, I will do that!

:sunglasses:

1 Like

BTW, I can confirm that this workaround is no longer necessary.

Rockstor 5.0.15 built on openSUSE Leap 15.6

2 Likes

Dear Simon, as a newbie in Rockstor and linux I tried your instructions step by step on ROCKSTOR 5.0.15-0 with openSUS Leap: 15.4 and crashed into a few issues:

  1. sudo usermod -aG libvirt <username> di not work, but sudo usermod -a -G libvirt <username> seems to have worked.
    
  2. sudo systemctl enable --now cockpit.socket
    

Hi @Dreamboxer, welcome to the Rockstor Forum

Thanks for giving this guide a try - however, I noticed you’re running Leap 15.4 while this guide requires Leap 15.6 (as mentioned in the prerequisites). This is very likely the root cause of your troubles.


You can verify if your user was added to the libvirt group with:

groups <username>


Regarding cockpit - it’s not officially available for Leap 15.4. It was first included in the official openSUSE repositories starting with Leap 15.6 (see Cockpit installation docs). You can check if something got installed with:

zypper se -i cockpit
systemctl status cockpit.socket

To follow this guide, you’ll need to upgrade to Leap 15.6. Since you’re on 15.4, this is a two-step process via the Rockstor documentation:

  1. Distribution update from 15.4 to 15.5

  2. Distribution update from 15.5 to 15.6

Once on 15.6, cockpit will be available from the default repositories and everything should work as described.

Cheers Simon

2 Likes

Hi Simon,

thank you for your fast and nice reply. After sending your request I as well notice that my system is outdated. After fooling around with on system upgrading… I messed up with wrong order 15.5-15.4-15.6 and crashed the installation. So after some more trouble of new installation I’m back at beeing happy with a new Rockstor 5.1.0-0 and openSUSE Leap: 15.6.

Now I’m ready to restart your VM installation instruction within the next days heading for a HomeAssistant OS installation.

Thank you so much for your reply, I’m glad that pros like you help out so nicely.
Al the best, dreamboxer2

2 Likes

Well-written guide, and Simon is always available, professional, and friendly. I was just thinking about following it to install HA OS and migrate my entire HA system, which currently runs on a dedicated machine. It would be great to hear from you about your experience when you get around to it.
Regards

Davide

1 Like

@dadozts I assume, you have looked into the Home Assistant Rock-on already and found that the docker version does not cover all your needs for HA?

1 Like

Of course, I’ve already tested the version available among RockStor. It’s obviously a CORE version, and I’ve been working on an OS version for almost 10 years. I need them to be perfectly identical to reach gateways, hubs, etc., and unfortunately, that’s not the case.
My house, everything (heating, irrigation, shutters, lights, gates, etc.) is managed via HA; only the alarm is independent. I can’t imagine having to start reviewing hundreds or thousands of automations, scripts, or anything else. A virtual machine with HA OS on the RockStor machine would be a viable solution.

Davide

1 Like

Hi Simon,

What I did so far:

  • managed to install Rockstor version: 5.1.0-0 using openSUSE Leap: 15.6
  • installed cockpit according your above instructions - thanks so much for the guide, Simon
  • created an Ubuntu-VM, it is just updating to Ubuntu 22.04

Now I’m running into some understanding issues:
My intention is as explained to run HA OS as VM on this Rockstor machine.
I watched you cool video ‘How to Setup Home assistant on Ubuntu (supervised) from scratch as virtual machine (KVM)’ and probably could run HA OS as a VM in that VM but isn’t it possible to install HA OS directly on the cockpit GUI?
Or is HA OS not an independant operating system and needs a linux to run on?

Hoping for your clarifying reply to unfold the knot in my head, best regards, dreamboxer

1 Like

Hi @Dreamboxer

Good progress on the setup!

First off - that video isn’t mine :grinning_face_with_smiling_eyes: Though I’m flattered by the accidental promotion

The confusion: in that video, Ubuntu is the host system (the hypervisor running KVM). You already have that covered - your Rockstor/openSUSE is the host. No need to create an Ubuntu VM first.

For HA OS as a VM on your Rockstor:

  1. Download the HAOS qcow2 image from Linux - Home Assistant
    → Look for “KVM/Proxmox (.qcow2)”
  2. Transfer the file to your server, e.g. with scp
  3. In Cockpit → Virtual Machines → Create VM
  4. Choose “Import existing disk image” and point to the downloaded qcow2
  5. Set up the VM as desired
  6. Boot and access HA at http://:8123

HA OS is a standalone system - includes its own minimal Linux. Works the same whether your host is Ubuntu, openSUSE, or anything else running KVM.

@dadozts - same applies for your migration. Restore your backup once the VM is running.

Cheers,
Simon

3 Likes

Hi Simon,

me too expected to have HA_OS running stand alone as a VM.
Following your instructions I was able to setup and run the HA_VM: (sorry for the German language)

I tried with OS selection Unknown, Void Linux, Generic Linux 2024 and Generic Linux 2022 .
Assuming there might be rights issues I changed the rights of the file as su from -rwxr–r+ with
chmod 777 haos_ova-17.0.qcow2
But unfortunately it does not boot properly.

Booting from Hard Disk…
This screen stays for more than 5 Minutes. Should I wait longer?
I changed Firmware to UEFI and then can enter the virtual UEFI-bios but screen before that shows

BdsDxe: No bootable option or device was found.
I can’t switch back from UEFI to Bios. Only deleting and new VM import helps to try other options.
Do you have any idea howto get it to boot?

Hi Dreamboxer,

This seems to be a known issue. HAOS images are UEFI-only, but Cockpit defaults to legacy BIOS. That’s why it hangs at “Booting from Hard Disk”.

Fix in Cockpit:

  1. Delete the VM (keep the qcow2)
  2. Create new VM → Import existing disk image
  3. Before first boot: In the Overview tab, click the “BIOS” link and switch to UEFI
  4. Then start the VM

Note: Cockpit enables Secure Boot with UEFI by default. If you get “Access Denied” or “No bootable option”, you need to disable Secure Boot: press Escape at boot → Device Manager → Secure Boot
Configuration → disable.

Refs:

3 Likes

Dear Simon,

thank you so much for your guiding.

The UEFI with deactivated secure boot worked immediately :wink:

After booting the VM I had to create the network bridge connection to reach my local ethernet.
I used the following instruction from chatGPT:

# Rockstor / openSUSE: Bridged Networking for Cockpit Virtual Machines

## Goal

Configure Cockpit virtual machines to obtain IP addresses from your

**router’s DHCP server** using a **Linux bridge** on Rockstor

(openSUSE-based) with a **wired Ethernet connection**.

------------------------------------------------------------------------

## Prerequisites

- Rockstor (openSUSE-based)

- Wired Ethernet connection

- Cockpit with Virtual Machines (libvirt)

- Router providing DHCP

------------------------------------------------------------------------

## Step 1: Identify Your Wired Network Interface

``` bash

nmcli device status

```

Example output:

DEVICE     TYPE      STATE     CONNECTION

enp2s0     ethernet  connected Wired connection 1

Note the Ethernet device name (e.g. `enp2s0`).

------------------------------------------------------------------------

## Step 2: Create a Linux Bridge

### Create the bridge

``` bash

nmcli connection add type bridge ifname br0 con-name br0

```

### Add the physical NIC as a bridge port

``` bash

nmcli connection add type ethernet ifname enp2s0 master br0

```

Replace `enp2s0` with your actual interface name.

------------------------------------------------------------------------

## Step 3: Configure IP Addressing on the Bridge

For DHCP (recommended):

``` bash

nmcli connection modify br0 ipv4.method auto ipv6.method auto

```

Bring the bridge up:

``` bash

nmcli connection up br0

```

:warning: Network reconnects are normal during this step.

------------------------------------------------------------------------

## Step 4: Disable the Old Standalone NIC Connection

``` bash

nmcli connection down “Wired connection 1”

```

(Optional but recommended):

``` bash

nmcli connection delete “Wired connection 1”

```

------------------------------------------------------------------------

## Step 5: Verify Host Networking

``` bash

ip addr show br0

```

Confirm: - IP address from router DHCP - Physical NIC enslaved to `br0`

Check routing:

``` bash

ip route

```

Default route must go via `br0`.

------------------------------------------------------------------------

## Step 6: Confirm libvirt Sees the Bridge

``` bash

nmcli connection show

```

or

``` bash

brctl show

```

`br0` should be listed.

------------------------------------------------------------------------

## Step 7: Configure VM Networking in Cockpit

1. Open **Cockpit → Virtual Machines**

2. Edit or create a VM

3. Network Interface:

-   **\*\*Type\*\***: Bridge

-   **\*\*Source\*\***: \`br0\`

-   **\*\*Model\*\***: \`virtio\`

4. Save

------------------------------------------------------------------------

## Step 8: Verify DHCP Inside the VM

Inside the VM:

``` bash

ip addr

```

Expected: - IP from router subnet - Gateway = router - DNS = router or

upstream

Check your router’s DHCP lease table to confirm.

------------------------------------------------------------------------

## Optional Notes

### Disable libvirt NAT (optional)

``` bash

virsh net-autostart default --disable

```

### Firewall

Ensure `br0` is assigned to an appropriate firewalld zone:

``` bash

firewall-cmd --get-active-zones

```

------------------------------------------------------------------------

## Summary

- Linux bridge (`br0`) connects VMs directly to LAN

- Router DHCP assigns VM IP addresses

- Works reliably on Rockstor with wired Ethernet

------------------------------------------------------------------------

## Rollback (Emergency)

If networking breaks:

``` bash

nmcli connection delete br0

nmcli connection up “Wired connection 1”

```

------------------------------------------------------------------------

2 Likes

@dadozts

Hello Davide,
I hope the created information to implement HA OS as VM in Rockstor works out for you as well.
I’m looking foreard to your reply.
Best regards, dreamboxer

1 Like

Hi, I’ll definitely share my feedback or, more likely, ask for help :wink:.
Unfortunately, I can only dedicate myself to the Rockstor machine at home on weekends, so this process is always taking a long time.
The basic requirement for me is that I can reach and manage the Zigbee and Bluetooth bridges with the VM, and it would be nice to be able to give those virtual machines a different network IP from those on the two network cards mounted on the Rockstor. This would allow for a painless migration, as I already did when migrating from a Raspberry Pi to a dedicated x86 machine.
But for this requirement, the most I can do is add a third network card to the Rockstor and take advantage of the opportunity to upgrade to 2.5 GB.

As soon as I get around to it, I’ll share all the information.

Best regards and thanks.
Davide

1 Like